Over the last weekend I was taking snapshots at a local festival. Instead of chimping, I was occasionally checking to make sure I got my shot. Some photos were coming out under exposed and some were severely over exposed. I was nearly in a panic, thinking that either my camera's batteries were dead or dying, or worse, that the metering system on the camera was broken.
I continued to shoot pictures, and I also continued to fuss and fume over the poor exposures. I took several shots of each pose to make sure that I got at least one in the ballpark. I was disgusted with my camera. I put it in its bag and left it there.
The next day, I pulled the camera out of its well deserved hidy-hole and started looking for possible signs and symptoms. I checked the mode setting, I checked the battery meter, I checked the neutral density filter, and I checked the mechanical aperture on the lens -- nothing. Finally I looked through the view finder and noticed that the exposure compensation setting was two stops higher than normal -- I never do that! Then, it dawned on me. I had recently been shooting exposure bracketed HDR, and I had forgotten to turn that mode off. Since I was shooting single images, instead of a rapid-fire sequence, my shots were under exposed, metered, and over exposed.
The moral of this tip is to always check your camera settings. You never know who might have set up something screwy in a previous shoot.
[Back to the Main Site]
Wednesday, October 24, 2012
Tuesday, May 15, 2012
Tip #104: Circles -- How to Make Them
A new feature on my website is Circles. The technique has been around for a long time, but I had not played with it until just recently. Here's a quick sample.
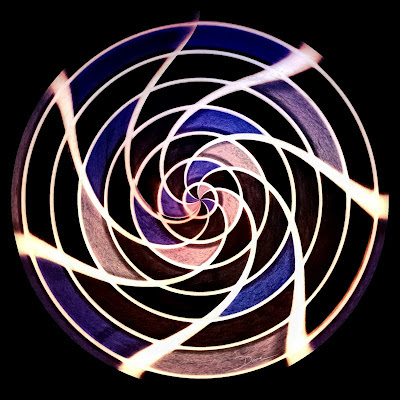
Here's how I make them:
There you go. Let your eyes be the guide for the amount of pinch and whirl that you apply.
The example, above, was orginally a simple shot of small colored tiles with white grout.
[Back to the Main Site]
Here's how I make them:
- I shoot ordinary subjects and look for colors that might work.
- I load the image into software that has Polar Coordinate filters, e.g. GIMP.
- I create a square crop.
- I convert the square crop to a circle with the Polar Coordinate filter.
- I apply the Whirl and Pinch filter or use iWarp or Liquify.
There you go. Let your eyes be the guide for the amount of pinch and whirl that you apply.
The example, above, was orginally a simple shot of small colored tiles with white grout.
[Back to the Main Site]
Monday, March 26, 2012
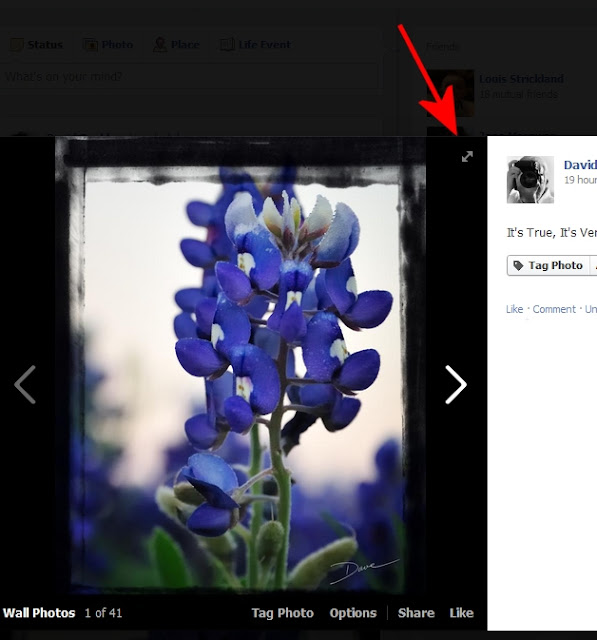
Tip #103: Full Screen View on Facebook
Image viewing on Facebook has changed several times in the last year. I have probably groaned each time a change has happened. Two recent changes, however, cause me to cheer. Images are now stored at full resolution and images can be viewed full-screen.
Here's how to use the feature, while on Facebook:
[Back to the Main Site]
Here's how to use the feature, while on Facebook:
- Click on an image of interest.
- When the image is displayed, hover your cursor over the image and notice the little double arrow in the upper right hand corner of the photo.
- Click on the double arrow, and the image will be displayed full-screen. Large images will fill the available screen space. Small images will be centered on the screen.

[Back to the Main Site]
Sunday, March 4, 2012
Tip #102: Macrophotography
There are many considerations for macrophotography, including lighting, contrast, subject motion, and others. There are special lenses, reverse mountings, and a slew of expensive options. However, most every camera has a close-up setting, often identified with a flower icon. That setting usually is a simple change of aperture setting to wide open, so that the shallow depth of field can be used to isolate the subject. Without any special equipment, you can take a decent close-up shot.
Filling the frame with your subject, can lead to pleasing, dramatic results. So can a close crop of an existing photo. Give it a try.
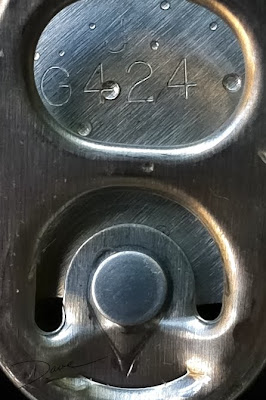
Note: This was shot with an iPhone, hand-held about two inches from the top of the can.
[Back to the Main Site]
Filling the frame with your subject, can lead to pleasing, dramatic results. So can a close crop of an existing photo. Give it a try.

Note: This was shot with an iPhone, hand-held about two inches from the top of the can.
[Back to the Main Site]
Sunday, February 26, 2012
Tip #101: Sandbagging, Literally
When you work with backdrop stands, light stands, and tripods, you will find that most everything you touch is top heavy. The stands are light but strong but can tip over and damage equipment or, worse, your clients. The answer is simple. Add a sandbag to the base of the stands to provide more stability. I use saddlebag type bags that can hold up to 20 pounds of sand. I found that each side of the bag will hold 2 quart-sized, ziplock, plastic bags filled with sand. The addition of the plastic bag liners keeps the sand in place and off the studio floor.
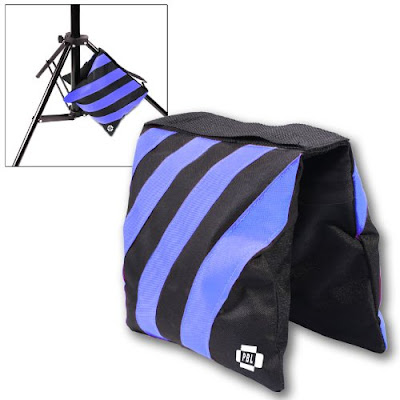
I bought mine on Amazon. Be sure you get the sand, locally; otherwise, the shipping costs will be heavy!
[Back to the Main Site]

I bought mine on Amazon. Be sure you get the sand, locally; otherwise, the shipping costs will be heavy!
[Back to the Main Site]
Thursday, February 23, 2012
Tip #100: Keep It Legal
If you are considering going pro, be sure you keep it legal. I am not talking about your subject matter, rather I'm speaking to the fact that if you sell photos, you will likely have taxes to pay on your sales.
When I looked into the process in Texas, I learned that failure to properly report such earnings comes with stiff fines -- up to $500 per day for each violation. So, I dutifully registered my photography business; I report sales on a quarterly basis; I collect sales taxes from my customers; and I promptly pay sales taxes as required by the state.
There is a bright side to all of this. I avoid the penalities of non-compliance, and I enjoy making tax-free purchases of business-related equipment, used exclusively for the production of photographic images. Note: I still pay sales tax on items for personal use.
Keep it legal; keep it honest; sleep well at night!
[Back to the Main Site]
Wednesday, February 22, 2012
Tip #99: Lights, Camera, Action
Studio lighting and lighting in general comes in many shapes, styles, and sizes. There are flash units, studio strobes, and continuous lighting options.
Regardless of the style lights that are used, their purpose is to light the subject so that the best color and detail can be shot with your camera. You have to balance your budget with your lighting needs.
I never said the hobby was inexpensive. Purchases can get pricey, especially if you are going pro.
[Back to the Main Site]
- Flash units are those that either fit on the hot shoe of your camera or mount on stands for off-camera use.
- Strobes are just fancy named flash units that are larger than the flash units that mount on your camera. Strobes are usually set on stands and have wired or wireless radio units that fire, when the camera shutter is pressed.
- Continuous lighting is just that. Instead of firing a flash of light, the lights stay on continuously, lighting your subject. Continuous lights come in both old-style, hot incandescent and modern, cool fluorescent.
Regardless of the style lights that are used, their purpose is to light the subject so that the best color and detail can be shot with your camera. You have to balance your budget with your lighting needs.
- Flash units are made by a variety of manufacturers for your specific camera type. Some can be triggered by wireless units or can have master-slave set-ups are are triggered optically. Check your camera manufacturer's web sites for recommendations.
- Strobes tend to provide more light than flash units but may be only a bit more expensive than high-end hot-shoe flash units. Elinchrom lights are highly recommended. I have seen them in action and some models, like the BXRi, have built-in wireless triggers.
- Continuous lights take much of the guess-work out of lighting arrangements, since you see the subject lighted, as your camera will see it. I use Westcott Spiderlight TD6's for my studio lights.
I never said the hobby was inexpensive. Purchases can get pricey, especially if you are going pro.
[Back to the Main Site]
Subscribe to:
Posts (Atom)