Catch lights, those nice reflections in the eyes of our subjects, make our images come alive. Catch lights and other lighting effects can be enhanced with the addition of a small reflector on the flash. Some flash units come with a built-in catch light reflector. If yours does not have one, then you can simply add a white 3x5 card to your flash unit, held in place with a rubber band.
To use this arrrangement, point your flash head straight up or tilted away from the subject a bit, add the white card at the back of the unit. The reflected light will softly illuminate your subject and will add sparkle to their eyes.
[Back to the Main Site]
Saturday, December 31, 2011
Friday, December 30, 2011
Tip #45: EXIF Exposed
Besides the pixels in your images, there is additional information stored within each image file. This extra meta-data is known as EXIF, Exchangeable Image File format. The details of the settings used to capture the image are listed in the EXIF for each photo. For cameras with location services (smartphones and newer digital cameras), the lattitude and longitude of the location of where the photo was taken is also stored. Some higher-end cameras even allow extra user information to be recorded, such as photographer's name, address, website, and copyright notice. I use these extra fields on each of my cameras.
Reading the EXIF data is pretty simple. On a Windows computer, you can right click on an image, select properties, then choose details. All the available information will be displayed. Nasim Mansurov has a nice article on the topic, complete with examples of different ways to view the EXIF data.
By knowing that the information is available, you can take steps to use it wisely. You can even address potential concerns, regarding the location information in your photos.
[Back to the Main Site]
Thursday, December 29, 2011
Tip #44: Battery Grip
I recently added a battery grip to my Nikon D7000. The MD-11 grip adds the capability to have more than one battery instantly available. It adds a vertical grip to the camera body for shooting portraits, and the extra weight helps balance long lenses. The MD-11 supports both the EN-EL15 camera battery and standard AA batteries.
[Back to the Main Site]
[Back to the Main Site]
Wednesday, December 28, 2011
Tip #43: Reflectors
Reflectors are great tools to add a little fill light, using the existing lighting. They work great in natural ambient light, strobe, and continuous lighting situations. Reflectors come in a variety of colors -- the most popular being white, silver, and gold. White reflects existing light; silver cools the existing light; and gold warms the existing light. Like light sources, the larger the source, the softer the reflected light will be.
My favorite is a 42-inch silver and gold mix, because it adds a nice touch to skin tones. I bought mine at Drop It Modern.

[Back to the Main Site]
My favorite is a 42-inch silver and gold mix, because it adds a nice touch to skin tones. I bought mine at Drop It Modern.
[Back to the Main Site]
Tuesday, December 27, 2011
Tip #42: Watermarks
This tip is a bit on the technical side. You will need software that can create and apply a transparent layer, such as Photoshop, Photoshop Elements, Paintshop, or other similar product.
A watermark is a "stamp" that is applied to a photograph to help indentify the owner of the photo. While it is not a perfect security system, it does make copyright infringement issues a bit easier. There are other means for photo identity security, and watermarks are just one method in my arsenal. You have probably seen my watermark -- images posted with the Awestruck-Images logo from my main web site, Awestruck Images.
I recently developed a new watermark that uses my signature. Here's how I did it.
To use the new watermark, I load a photo to be edited, then I layer the watermark on top of the image. Because the watermark is it's own layer I can adjust its transparency or use the negative of the image as needed for differently colored photographs. When I am satisfied with the result, I merge the layers together and save the final image. An example of the new watermark is in Tip #38.
[Back to the Main Site]
A watermark is a "stamp" that is applied to a photograph to help indentify the owner of the photo. While it is not a perfect security system, it does make copyright infringement issues a bit easier. There are other means for photo identity security, and watermarks are just one method in my arsenal. You have probably seen my watermark -- images posted with the Awestruck-Images logo from my main web site, Awestruck Images.
I recently developed a new watermark that uses my signature. Here's how I did it.
- With a ballpoint pen, I autographed a plain white sheet of paper.
- I scanned the signature at high resolution (600 dots per inch). If you don't have a scanner, then just use your camera to capture the image.
- I loaded the resulting TIFF into my photo editor.
- I performed an edge-preserving-smooth operation on the image, twice.
- I performed a de-speckle operation to make the "signature" nice and dark.
- With a selection tool, I selected the different pieces of the signature and saved the signature as a transparent layer.
To use the new watermark, I load a photo to be edited, then I layer the watermark on top of the image. Because the watermark is it's own layer I can adjust its transparency or use the negative of the image as needed for differently colored photographs. When I am satisfied with the result, I merge the layers together and save the final image. An example of the new watermark is in Tip #38.
[Back to the Main Site]
Monday, December 26, 2011
Tip #41: Down the Road
So, you're stuffed like a turkey, you are the passenger in a moving vehicle -- don't attempt this tip while driving -- and you have your new camera in your lap. You have fiddled with all the controls, you have composed your best shots, you are planning to add a little contrast in post-processing, now what? Here's something new to try.
Set your camera to aperture priority, A for Nikon, AV for Canon. Set the f-stop to f/16 or f/22, set focus to auto or infinity. Now, while moving at somewhere between the posted limit and your comfortable speed, roll down the passenger window and point your camera at the scenery, passing by. As you pass a clump of bushes or stand of trees, without looking through the view finder, click off a few shots. You will get something like this:
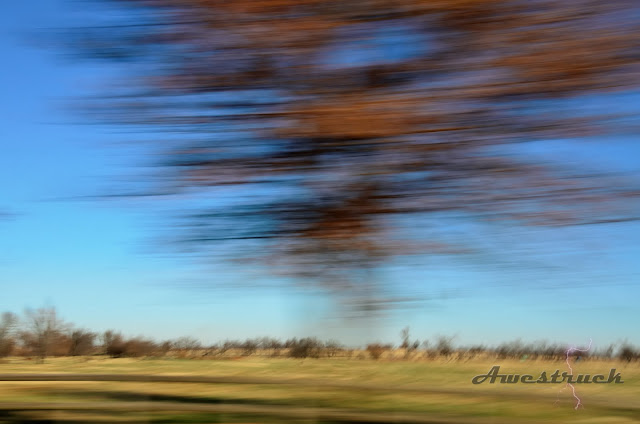
My inspiration for this technique came from a guest blogger on Scott Kelby's site, http://www.scottkelby.com/blog/2010/archives/12896. Take a look, and like me, maybe you will be inspired to try something new.
[Back to the Main Site]
Set your camera to aperture priority, A for Nikon, AV for Canon. Set the f-stop to f/16 or f/22, set focus to auto or infinity. Now, while moving at somewhere between the posted limit and your comfortable speed, roll down the passenger window and point your camera at the scenery, passing by. As you pass a clump of bushes or stand of trees, without looking through the view finder, click off a few shots. You will get something like this:
My inspiration for this technique came from a guest blogger on Scott Kelby's site, http://www.scottkelby.com/blog/2010/archives/12896. Take a look, and like me, maybe you will be inspired to try something new.
[Back to the Main Site]
Sunday, December 25, 2011
Tip #40: Hope for the Planet
Leaning on my Christian background, I have hope for our planet. That hope is
Peace on Earth, Goodwill to All
Regardless of our faith backgrounds, we all can do our part to fullfill this hope, also from my Christian background:
Do Justice, Love Kindness, and Walk Humbly with Our Creator
Merry Christmas!
[Back to the Main Site]
Regardless of our faith backgrounds, we all can do our part to fullfill this hope, also from my Christian background:
Merry Christmas!
[Back to the Main Site]
Saturday, December 24, 2011
Tip #39: Get Better Color
If you want your photos to snap with color, there are a couple of things to do. First, find the time of day that has more color, usually early mornings and evenings. Second, adjust your camera to capture more color. Look for a menu setting, called picture control, and choose VIVID.
Read more on camera settings on Ken Rockwell's site. Ken also has an article on the best time of day to take pictures. Both are worth a read.
[Back to the Main Site]
Read more on camera settings on Ken Rockwell's site. Ken also has an article on the best time of day to take pictures. Both are worth a read.
[Back to the Main Site]
Friday, December 23, 2011
Tip #38: Fun Stuff to Do
Let's have some fun. Here's are a couple of free, photo-to-cartoon applications I found on the web:
These applications are fun to use and cost nothing. So, go create a cartoon and send it to me. I will post them in a gallery just for toons.

Send your best cartoons to dave@awestruck-images.com.
[Back to the Main Site]
- www.cartoonize.net -- this one is easy to use, but you have little control. The resulting files are about the same dimensions of the input file.
- www.befunky.com -- this one is a bit harder to use, but you have more control. The resulting files are limited in size but will work well for profile photos. You do have the option of paying for an upgrade to unlock premium content and larger file sizes.
These applications are fun to use and cost nothing. So, go create a cartoon and send it to me. I will post them in a gallery just for toons.
Send your best cartoons to dave@awestruck-images.com.
[Back to the Main Site]
Thursday, December 22, 2011
Tip #37: On the Horizon
Generally, when composing images, natural horizons and vertical references should be on the level and up-and-up, unless you are making a dramatic, creative statement that involves a tilted subject. Here's a second opinion.
[Back to the Main Site]
[Back to the Main Site]
Wednesday, December 21, 2011
Tip #36: HDR
You may have heard of HDR, but what is it? HDR is high dynamic range, which means that the image has detail in highlighted areas and in shadow areas, simultaneously. Typically, a set of images, shot at different exposures, are blended together with special software to create a single image with high dynamic range. I usually take 5 frames, camera on a tripod, at EV-2, EV-1, EV-0, EV+1, and EV+2. That set of images creates a wide spectrum of detail.
Later versions of Photoshop have the tools to process HDR, as do other products. I prefer stand-alone software that is specifically made to process HDR. Photomatix is one such package that I have tried. My software of choice is Nik Software's HDR Efex Pro. The results can be subtle to surreal.


[Back to the Main Site]
Later versions of Photoshop have the tools to process HDR, as do other products. I prefer stand-alone software that is specifically made to process HDR. Photomatix is one such package that I have tried. My software of choice is Nik Software's HDR Efex Pro. The results can be subtle to surreal.
[Back to the Main Site]
Tuesday, December 20, 2011
Tip #35: iPhone Apps
Today's tip is about iPhone Apps. Yes, Virginia, I do shoot photos with my iPhone. With a little patience, images can be pretty good. The applications that run on iPhones range from toy camera apps to fairly nice editing apps. I own several, and until now, I had not counted them. Here goes.

I hope you give one or more of these a try.
Update 1/20/2012: Snapseed, the mobile photo app that I have crowed about, is now available for the Mac desktop and is coming to Windows in the near future. WOOT!
[Back to the Main Site]
- Camera+ ($.99) is my everyday app, replacing the default camera app. Camera+ takes a quick photo with independent focus and aperture placement. It also has many filters that change the appearance of the final photo.
- Pocket Light Meter (free) is the app that does just what is says. It serves as a reasonable light meter to assist with ISO, aperture, and shutter speed settings.
- PS Express (free) is Adobe's entry into the app world. It is nothing like the full blown Photoshop, except it does make image editing pretty simple.
- blueSLR (free) is a geo-tagging and remote control application. The app is free but the camera attaching GPS-dongle is an expensive add-on to a DSLR ($149).
- Picasa Web Mobile (free web app) is the mobile complement to the Picasa desktop software.
- Seadragon is an app that allows mobile viewing of Photosynth images. Unfortunately, the app is no longer available on the app store.
- Nikon Learn and Explore (free) is an app that serves up photography training modules.
- Square (free) is an app and a dongle that lets anyone collect credit card payments.
- Gorillacam (free) is another replacement for the default camera app. This app allows rapid fire photos and can be set up to take a photo anytime the iPhone screen is touched.
- Snapseed ($4.99) is Nik Software's photo editing app with filters that makes full use of the touch interface on the iPhone and iPad. This one is my favorite.
- Snap&Sketch ($.99) takes your photos and converts them into pencil, charcoal, or crayon sketches. I like this one, too.

I hope you give one or more of these a try.
Update 1/20/2012: Snapseed, the mobile photo app that I have crowed about, is now available for the Mac desktop and is coming to Windows in the near future. WOOT!
[Back to the Main Site]
Monday, December 19, 2011
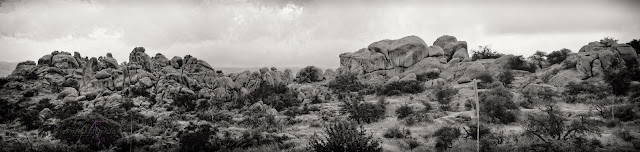
Tip #34: Panoramas
Before I learned the secret, I was intimidated by panoramas. I knew how to take a series of photos of a grand vista, and I knew that I had to stitch them together. I just knew the process was going to be tedius, and I expected the results to be only so-so. As a result I avoided the whole process, altogether.

While visiting a friend's home, I was amazed at the mountain scenery that graced the walls of his home. The panoramic photos were stunning. I knew I had to discover the techique, and I persuaded my host to give a quick class at a photo lunch-and-learn session that I was hosting at my office. My co-workers agreed that panos would be a good topic.
Randy began his class by showing us a panorama of the duck pond near our office. He took the photos the day before and stitched them together, just before the class began. Here's his secret: take photos left to right (right to left -- it really dones not matter) and overlap the frames by about 20%. The software can make use of overlapping rows of photos, too. Hand-held works OK, but using a tripod will yield the best results. Download the photos to your computer and stitch them together with Microsoft ICE. The software does the hard work and the results are amazing. The software even blends slightly mismatched exposures.
Another tip for panoramas that I learned from multiple sources is to take a frame with a single finger held up in front of the lens. This marks the begining of a pano series. At the end of the series take one more frame, holding up two fingers. Your usable images are between the finger markers!
[Back to the Main Site]
Sunday, December 18, 2011
Tip #33: Portraits
Let's be candid. Most photos that we take are candids. They are spur of the moment captures of the folks around us. Portraits on the other hand are carefully posed and designed to make the subject look good.

There are five classic feminine poses: profile left, profile right, 3/4 right, 3/4 left, and full-face. Masculine poses fall into the same categories but are set up to emphasize strength. The primary differences in the two styles are head tilt and feet placement. Feminine poses are generally S-poses, while masculine poses are C-poses. Women can be posed in either, while S-poses may be too soft for men.

[Back to the Main Site]
There are five classic feminine poses: profile left, profile right, 3/4 right, 3/4 left, and full-face. Masculine poses fall into the same categories but are set up to emphasize strength. The primary differences in the two styles are head tilt and feet placement. Feminine poses are generally S-poses, while masculine poses are C-poses. Women can be posed in either, while S-poses may be too soft for men.
[Back to the Main Site]
Saturday, December 17, 2011
Tip #32: Straps
Have you considered the strap that supports your camera? If you have not attached the strap, you will eventually need to do so. Be sure you follow the mounting directions. Having the strap securely attached will save you some worry and will come in handy to support your camera.
The strap that came with your camera will probably work just fine. There are alternatives that may suit you better. The strap that came with your camera may also advertise to criminals a lot about your expensive camera, especially with the name of the camera sewn in and advertising what you are carrying.
I use products from Black Rapid. I like the diagonal carry strap with attachment systems that makes use of the tripod mount on the bottom of the camera body.
[Back to the Main Site]
Friday, December 16, 2011
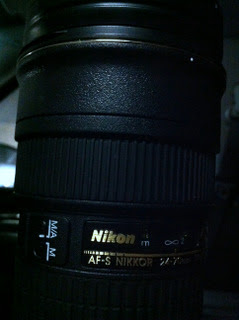
Tip #31: Lenses
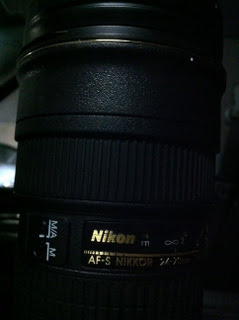
In the "biz" lenses are called glass, because the best of them are made with glass optical elements. Lenses are the eyes of your camera -- the better the eyes, the better the images. Your investment in good glass should be a primary consideration, when you make your purchases. Of course, good glass does not come cheap.
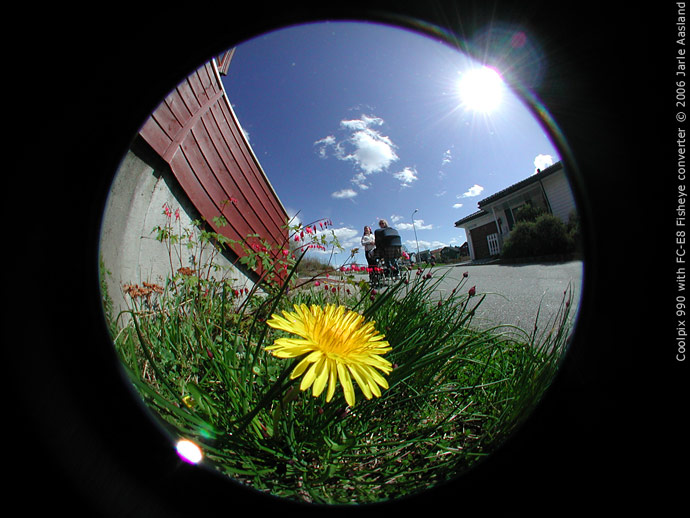
There are wide angle lenses, some so wide they are called fish-eye; there are telephoto lenses; there are zoom lenses and primes. Here's a quick definition for each:
[Back to the Main Site]
There are wide angle lenses, some so wide they are called fish-eye; there are telephoto lenses; there are zoom lenses and primes. Here's a quick definition for each:
- Wide-angle lenses have a wide angle of view and short focal lengths (35mm and shorter) -- think landscapes.
- Fish-eye lenses are for extreme wide angle shots (8 - 16mm). They often result in images that cover more than 180 degrees of view and, without adjustment in post processing, have a spherical feel about them.
- Telephoto lenses magnify the subject, bringing the photographer closer without disturbing the subject ( > 50mm focal lengths) -- think wildlife photography.
- Zoom lenses have the capability of changing the focal length via mechanical adjustment (e.g. 28 - 300mm) -- think of many lenses combined into one. The capability allows the photog to have great flexibility in how an image is composed. Over the years the quality of zoom lenses has improved to the point that fewer lenses are needed in the camera bag.
- Prime lenses are lenses with only one focal length. Because they have fixed focal lengths, prime lenses are the sharpest lenses available.
Note: Lenses used to shoot portraits are often in the 85mm to 120mm range -- facial features look good and the background bokeh, controlled with wide aperture settings, can be very nice.
[Back to the Main Site]
Thursday, December 15, 2011
Tip #30: Bags, Bags, Bags
I have three different camera bags, but I only use two of the them. The bag I no longer use is the kit bag that came with the first DSLR that I purchased. That bag was a traditional camera bag large enough for a camera body, a spare lens, and a few accessories. I actually traveled with that bag all across northern Europe.
Since then, I have purchased two additional bags, one to carry everything and the other to help conceal the fact that I am carrying a camera. The first is a Kata 30, 3N1. It's a right or left sling bag and a full-on backpack. It also has an attachment loop that slides onto my pull-along suitcase handle. The second bag is a Tenba messenger style shoulder bag. The Tenba is my every day camera bag. It has a nice shoulder strap and a carry handle and holds a camera with lens attached, a few accessories, and has a sleeve pocket for an iPad or notebook size computer. When I carry it, it looks like many other shoulder bags carried on a college campus.
All three bags provide vital protection for the gear I use. Oh and the tip, a pillow case is not good carry device for a camera.
[Back to the Main Site]
Wednesday, December 14, 2011
Tip #29: Workflow, What Is It?
When I was first getting started, I read about pros and their workflows. I was intrigued and confused. How do I get one? Where do I start? What is it?
SPOILER ALERT: here's the answer; there is no mystery! Workflow is just the repeatable process of getting captured images from your camera to their final destination -- print, display, or other product.
My High Level Workflow:
Visit blog.ChaseJarvis.com to view a complex workflow.
[Back to the Main Site]
SPOILER ALERT: here's the answer; there is no mystery! Workflow is just the repeatable process of getting captured images from your camera to their final destination -- print, display, or other product.
My High Level Workflow:
- Transfer images from camera memory cards to desktop computer.
- Copy images to network storage drive.
- Copy images to portable drive 1 for on-site storage.
- Copy images to portable drive 2 for off-site storage.
- Review and tag images for editing priority 1, 2, or 3 (View NX2).
- Perform basic editing on images marked with a 3 (Capture NX2). Basic editing includes applying noise reduction, adding contrast, and sharpening for each photo.
- Build and deliver proofsheets, as necessary.
- Get client feedback.
- Perform final edits, based on customer decisions.
- Create and deliver final product. Get paid.
- Make project backups to previously mentioned storage areas.
Visit blog.ChaseJarvis.com to view a complex workflow.
[Back to the Main Site]
Tuesday, December 13, 2011
Tip #28: On-Camera Flash -- Redux
In Tip #6, I wrote about on-camera flash. In that tip I recommended purchasing an external flash with the capability to bounce light onto your subject. That works fine for external flash units. What about the built-in, pop-up flash that most cameras have?
Well, there is a solution that works somewhat better than the harsh, direct light provided by most pop-up flashes. Lumiquest makes a diffuser for pop-up flashes. Here's a sample shot using this kind of diffuser:

[Back to the Main Site]
Well, there is a solution that works somewhat better than the harsh, direct light provided by most pop-up flashes. Lumiquest makes a diffuser for pop-up flashes. Here's a sample shot using this kind of diffuser:
[Back to the Main Site]
Monday, December 12, 2011
Tip #27: Cropped vs Full Frame
Digital camera sensors, the electronic parts that capture images, come in a variety of sizes. Inexpensive cameras use small sensors, and higher end cameras typically use larger sensors. When a manufacturer uses a sensor that can reproduce an image equivalent in size to a 35mm film camera frame, the sensor is called a full-frame sensor. In Nikon terms that sensor is called FX.
For cameras with smaller sized sensors, the sensors are known as "cropped". And, just as in post processing the cropped sensor provides the effect of zooming in on the subject. One of the popular Nikon cropped sensors is called DX. A DX-sensor equipped camera provides a crop or zoom factor of about 1.5.
Why does any of this matter? As sensors get smaller for less expensive cameras, either the number of sensor elements has to go down, or the size of the elements has to go down to fit in the same space. As the size of the elements go down, the overall sensor becomes less sensitive to light. You may end up with a high mega-pixel camera that only takes pictures in bright light. On the other hand cameras with large sensors can use relatively large sensor elements, which are more sensitive to light, and therefore, work better in low light conditions. A second reason this matters is wide angle lenses lose their apparent wide-angles by the crop factor, e.g on a DX-sensor 18mm becomes 27mm. On the other end of the scale, telephoto lenses gain a little reach, e.g. on a DX-sensor a 200mm lens becomes zoomed (cropped) to 300mm.
Camera lens manufacturers build lenses to take advantage of the different type sensors. As a result and practically speaking, price and performance of cameras and lenses are the trade-offs for the different sized sensors.
[Back to the Main Site]
Sunday, December 11, 2011
Tip #26: Memory Cards
Memory cards in your cameras are the film of the digital scene. Memory cards are rated by the transfer speeds that they support. I tend to use SanDisk products because of their reliability. I use both SDHC and CF cards, and I look for the Extreme or Extreme Pro versions of each type. The faster the transfer speed of the card, the faster your camera can cycle its shutter, up to the rated frames per second of your camera.
The second part of this tip is that I always reformat the memory cards, after I download the images from them. Simply deleting the files can lead to error conditions on the memory card. The formatting process helps the card map bad areas on the card and prevents data (photos) from being written in potentially bad regions of the card. After all, you don't want to lose a perfect picture due to a card malfunction.
Finally, don't put your entire collection of vacation pictures on one memory card. If a card does go bad, and it will, you won't have all your photos in one place.
[Back to the Main Site]
Saturday, December 10, 2011
Tip #25: Photography Books
Just like cameras, there are hundreds of photography books. Next to my cameras and lenses, the single best investment I have made in this area is a boxed-set of books by Scott Kelby. Scott writes in an informative manner, providing just enough technical know-how to make the reading interesting without spending pages on theory. In this collection Scott taught me (teaches you) to make better photos.
Scott also has recommendations about his favorite books. Any would make great gifts for me or your favorite photog.
[Back to the Main Site]
Scott also has recommendations about his favorite books. Any would make great gifts for me or your favorite photog.
[Back to the Main Site]
Friday, December 9, 2011
Tip #24: Printing Photos
With the ease of posting images on the Internet, why in world would anyone print a photo? Why would you not print your art to be enjoyed by someone other than your virtual friends?
Where can you get you photos printed? Home printers can produce a small run of images in limited sizes of prints. Large format printers grow expensive and are usually not found in homes. Your camera specialty store will often have the capabilities to print many sizes of photos. Then, there are labs that do custom printing on most any size and quality of paper or other media.
Two popular labs, used by photography pros are Mpix and Bay Photo. I have accounts with both labs. They do quality work and can usually create the final product in a matter of days. Their input systems are color calibrated to the printers and inks that are used to create everything from wallet-sized proofs to wall-hangings to prints on special media, such as coffee mugs, fabrics, and metal.
Don't let all you images drown in a sea of Internet postings. Venture out and get some printed. The results will be admired for years, when they hang on your wall instead of being posted there.
This image, named Mist, hangs in my living room, it is framed in wood and measures 24x36 inches.

[Back to the Main Site]
Where can you get you photos printed? Home printers can produce a small run of images in limited sizes of prints. Large format printers grow expensive and are usually not found in homes. Your camera specialty store will often have the capabilities to print many sizes of photos. Then, there are labs that do custom printing on most any size and quality of paper or other media.
Two popular labs, used by photography pros are Mpix and Bay Photo. I have accounts with both labs. They do quality work and can usually create the final product in a matter of days. Their input systems are color calibrated to the printers and inks that are used to create everything from wallet-sized proofs to wall-hangings to prints on special media, such as coffee mugs, fabrics, and metal.
Don't let all you images drown in a sea of Internet postings. Venture out and get some printed. The results will be admired for years, when they hang on your wall instead of being posted there.
This image, named Mist, hangs in my living room, it is framed in wood and measures 24x36 inches.
[Back to the Main Site]
Thursday, December 8, 2011
Tip #23: Cropping for Prints
In a previous tip, I wrote on cropping people. Photos often need to be cropped for display or printing, too. There are the typical sizes that we a familiar with: 4x6, 8x10, 11x13, 16x20, etc. Square formats are also trending, now.
If you know you are going to be cropping for a special size, fill the frame, when you compose the shot, but remember to leave enough negative space for your final, planned output.
For the web, most anything goes. I typically use a 2x3 or 3x2 width to height ratio, but I do mix it up for variety. Panoramas tend to be wider and have strange ratios, depending on the number of frames that I capture in a panorama. A Scott Kelby trick that I mimic is to use a 16x9 crop for a cinematic look.

[Back to the Main Site]
If you know you are going to be cropping for a special size, fill the frame, when you compose the shot, but remember to leave enough negative space for your final, planned output.
For the web, most anything goes. I typically use a 2x3 or 3x2 width to height ratio, but I do mix it up for variety. Panoramas tend to be wider and have strange ratios, depending on the number of frames that I capture in a panorama. A Scott Kelby trick that I mimic is to use a 16x9 crop for a cinematic look.
[Back to the Main Site]
Wednesday, December 7, 2011
Tip #22: Buying a Camera -- Part 2
I took a walk around a Frys store last evening. Wow! The camera department must have had 200 different models. The choices truly were overwhelming. My recommendation to visit a camera specialty store has been confirmed. Do it to save your sanity.
About five years ago, I was faced with the decision to buy a new camera. A new grandson was on the way, and I knew I wanted a camera better than the point-and-shoot, a Casio Z3, that I had used for several years. I knew I wanted less shutter lag -- the time between pushing the shutter and the time that a photo is taken. I knew I wanted to return to an SLR format, and I knew I wanted to stay digital. I spent hours researching on the Internet, and finally, I walked into a camera shop and asked the guy behind the counter to help. I had always heard that Nikon was a good camera, so I let the discussion go in that direction. The dealer was very helpful and recommended a couple of models.
I returned to the Internet to read reviews of the models that I learned about at the store. I found Ken Rockwell's web site and read his reviews. Ken does a very thorough review and makes good recommendations. His current proclamation of the finest point-and shoot camera is a Canon model. He also made a very solid review of the Nikon DSLR that I favored. I bought the D40x and shot with it for several years. About a year ago, I upgraded to a Nikon D7000, selling my D40x to a friend that was just getting started.
What's left to do? There are many factors in the decision process. Do your online research. Introduce yourself to a camera dealer in your area and get better educated, then enjoy the camera that you buy. In the central Texas area, I highly recommend Precision Camera.
Still need a recommendation, here is one I gave to friends a short while back:
[Back to the Main Site]
About five years ago, I was faced with the decision to buy a new camera. A new grandson was on the way, and I knew I wanted a camera better than the point-and-shoot, a Casio Z3, that I had used for several years. I knew I wanted less shutter lag -- the time between pushing the shutter and the time that a photo is taken. I knew I wanted to return to an SLR format, and I knew I wanted to stay digital. I spent hours researching on the Internet, and finally, I walked into a camera shop and asked the guy behind the counter to help. I had always heard that Nikon was a good camera, so I let the discussion go in that direction. The dealer was very helpful and recommended a couple of models.
I returned to the Internet to read reviews of the models that I learned about at the store. I found Ken Rockwell's web site and read his reviews. Ken does a very thorough review and makes good recommendations. His current proclamation of the finest point-and shoot camera is a Canon model. He also made a very solid review of the Nikon DSLR that I favored. I bought the D40x and shot with it for several years. About a year ago, I upgraded to a Nikon D7000, selling my D40x to a friend that was just getting started.
What's left to do? There are many factors in the decision process. Do your online research. Introduce yourself to a camera dealer in your area and get better educated, then enjoy the camera that you buy. In the central Texas area, I highly recommend Precision Camera.
Still need a recommendation, here is one I gave to friends a short while back:
BTW, the Nikon web address is www.nikonusa.com. The camera models that I mentioned are the D3100, D5100, and D7000. Depending on your budget, any of them would work great for you. All three are SLR cameras and are a major step up from either a phone camera or a small point-and-shoot. I highly recommend a visit to Precision Camera. The staff, there, are very knowledgable and can help you with your decisions. They often have specials for camera body and lens purchases [as do most dealers].
[Back to the Main Site]
Tuesday, December 6, 2011
Tip #21: Buying a Camera -- Part 1
On the topic of buying a camera, I must warn you, I am biased toward quality. As a result, my first recommendation for you is to find a local camera dealer and spend some time in the shop, looking and browsing. The camera specialty stores have trained staff that are usually photographers, themselves, and the shops are typically certified and authorized dealers for the equipment that they sell and repair. They will will also let you hold the product and will explain all the controls. Be prepared to answer the question, "what kind of pictures do you want to take?"
Avoid the department stores and big-lots stores, at least until you become educated. The department stores are typically authorized dealers, but the staff is trained to sell a little bit of everything and may not have the skills or knowledge beyond what they read on the glossy product brochures. When you have become educated about the various products, you may be tempted to buy a great deal. Consider this: when you walk out, the giant department store no longer knows you.
Which camera style should you purchase? If you have a recent vintage camera phone, learn to use it. If you prefer a separate camera, then you have many choices. There are point-and-shoot models; there are 4/3 cameras; there are mirror-less models; there are models that take movies; there are models with more pixels and fewer pixels; and there are DSLR's. In short, there are so many products that the choices are overwhelming. Generally, you cannot go wrong, if you choose something from Canon or Nikon. There are other good manufacturers, but, like I said, I am biased toward quality.
Stay tuned for Part 2.
[Back to the Main Site]
Monday, December 5, 2011
Bonus Tip: It's the Art that Counts
Last summer, I received a request, asking permission from an artist to use one of my photos for a painting that she was doing. I gave permission, and, yesterday, I received this email update:
BTW, Michael is the painter's son, who is a soldier, returning home from a combat deployment.
I am touched, honored, and Awestruck!
The results are in. Take a look at Tip #95.
[Back to the Main Site]
Hi David!
I'm long over due to provide you status on the bluebonnet painting. The last day of painting class was this past Wednesday. Although the painting is not finished, I'm well on my way with some 36 hours of effort. I plan to complete the project in time for Michael’s arrival on 12/17, and will present to him for Christmas.
While in painting class I have received many complements on my work; even from visiting professional artists. I know most of the credit goes to you for the great composition. Once Michael knows the whole story of how your work inspired me to paint this gift, I hope you two meet and view the painting in person. Please understand I have become one with the painting and no longer concern myself with an exact duplication of your original yet wonderful photograph but must tell you I’m so enjoying the process.
I was in Austin for Thanksgiving and hoped to meet you in person but noticed your calendar showed you as out of office. If you’re ever in St. Louis on business please contact me. Once I complete the Bluebonnets near Round Rock painting, I will send you a photo.
BTW, Michael is the painter's son, who is a soldier, returning home from a combat deployment.
I am touched, honored, and Awestruck!
The results are in. Take a look at Tip #95.
[Back to the Main Site]
Tip #20: iPad Camera Connection
When dealing with clients, I soon learned that they usually want instant gratification during or immediately after a shoot. The tool that helps me do this is the Apple iPad.
On a recent event shoot, the client asked, "How soon will I be able to see photos?" Moments before, I had pulled a memory card from the camera and used the iPad Camera Connection Kit to transfer the files from the card to the iPad. I showed the client the results of a few of my selected shots from the day's shoot. The client was thrilled to see large scale images so quickly. About an hour later, I recovered the iPad that had been passed from guest to guest.
Terry White has done a lengthy review of the iPad as a photography workflow tool. A visit to his site is worth the effort.
[Back to the Main Site]
Sunday, December 4, 2011
Tip #19: What about Zoom
There are three types of zoom that you may encounter. I highly recommend two of them and want share a caution about the third. Zoom is the process that gets us closer to our subjects.
The first is human zoom. This is where the photographer uses their feet to get closer to the subject. This works well when the subject is friendly and does not attempt to flee upon detection of a camera. Fleeing is common to teenagers and other wild animals.
The second type of zoom comes in the form of telephoto lenses. These lens allow the photographer to get really close to the subject, sometimes without being detected. Zoom lenses come in a variety of focal lengths. You choose the focal length that works well for what you are doing. For instance, wide angle zoom works well for landscapes; mid-range zooms work well for walk-around photography; and long zoom lenses work well for many things, including portraits and wildlife photography. Each class of zoom lenses have their sweet spots and shortcomings. Sharpness, distortion and price are often trade-offs that must be considered. I use a couple of lenses that that cover a long range of focal lengths, 18 to 200 mm and 28 to 300 mm. The flexibility of these lenses offer a lot of freedom, but some distortion is the penalty that I pay. Fortunately, the software I use has built-in corrections for lenses that I use, and if necessary, I can correct most of the distortion with a mouse click.
The third type of zoom, which I recommend against, is digital zoom. Digital zoom could more appropriately be called digital crop, because that is exactly what happens in the camera. As you adjust the digital zoom on the camera, the camera is actually cropping the image captured by the sensor and throwing away part of the detail. The effect is an image that appears magnified but is actually just a portion of the image's data spread out wider on the viewer screen. To overcome digital zoom shortcomings, I recommend using human zoom to capture the image or use the cropping capabilities, found in your post processing software.
[Back to the Main Site]
Saturday, December 3, 2011
Tip #18: To the Light
As you develop your photography eye, you will find that you begin to observe your surroundings as through a viewfinder. At one point I even said out loud, "I see everything through an 85mm lens." Of course that is probably, mostly hyperbole, but my audience knew what I was trying to say.
At a seminar I attended for portrait photography, the instructor, Clay Blackmore, kept saying to shoot the light. His premise was that light will tell you where to shoot. He has now refined his instruction to Find the Light. Today's tip is just that, find the light and let it define your next image.
Here's my literal interpretation:

[Back to the Main Site]
At a seminar I attended for portrait photography, the instructor, Clay Blackmore, kept saying to shoot the light. His premise was that light will tell you where to shoot. He has now refined his instruction to Find the Light. Today's tip is just that, find the light and let it define your next image.
Here's my literal interpretation:
[Back to the Main Site]
Friday, December 2, 2011
Tip #17: Take Pictures
Practice makes perfect, so here we go.
This tip is an audience participation tip. Choose a subject, any ol' subject, and take 25 shots of that object. Try different camera settings, use flash, don't use flash, daytime, nighttime, try different angles, up close and not so close, just take photos of your one chosen subject. Then, choose the best shot of your collection of 25, and send it to me, along with a short description of what you learned from the exercise. I will build a gallery of our images with descriptions for everyone to enjoy.
Send your photos to dave@awestruck-images.com.
To practice what I teach, I will take my 25, too. Happy Shooting!
Click here to visit Shoot-25 gallery.

[Back to the Main Site]
This tip is an audience participation tip. Choose a subject, any ol' subject, and take 25 shots of that object. Try different camera settings, use flash, don't use flash, daytime, nighttime, try different angles, up close and not so close, just take photos of your one chosen subject. Then, choose the best shot of your collection of 25, and send it to me, along with a short description of what you learned from the exercise. I will build a gallery of our images with descriptions for everyone to enjoy.
Send your photos to dave@awestruck-images.com.
To practice what I teach, I will take my 25, too. Happy Shooting!
Click here to visit Shoot-25 gallery.
[Back to the Main Site]
Thursday, December 1, 2011
Tip #16: Add Contrast
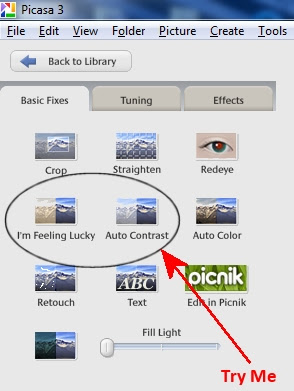
Next to composition, I believe good contrast is what makes a photograph. Whether I take a photo with my phone, with a point-and-shoot, or with a DSLR I always think the resulting image looks flat, especially unprocessed raw files. One of the first adjustments I make to every photo is bumping up the contrast. A subtle change is, sometimes, all that is necessary.
Depending on the photo editor that you use, you may have an auto-adjust button, a contrast slider, or an amplify blacks slider. Play around and see how adding a little contrast will make your images pop. In Picasa, the basic controls look like this:
[Back to the Main Site]
Depending on the photo editor that you use, you may have an auto-adjust button, a contrast slider, or an amplify blacks slider. Play around and see how adding a little contrast will make your images pop. In Picasa, the basic controls look like this:
| Before "Auto Contrast" | After "Auto Contrast" |
 |  |
[Back to the Main Site]
Subscribe to:
Posts (Atom)