Over the last weekend I was taking snapshots at a local festival. Instead of chimping, I was occasionally checking to make sure I got my shot. Some photos were coming out under exposed and some were severely over exposed. I was nearly in a panic, thinking that either my camera's batteries were dead or dying, or worse, that the metering system on the camera was broken.
I continued to shoot pictures, and I also continued to fuss and fume over the poor exposures. I took several shots of each pose to make sure that I got at least one in the ballpark. I was disgusted with my camera. I put it in its bag and left it there.
The next day, I pulled the camera out of its well deserved hidy-hole and started looking for possible signs and symptoms. I checked the mode setting, I checked the battery meter, I checked the neutral density filter, and I checked the mechanical aperture on the lens -- nothing. Finally I looked through the view finder and noticed that the exposure compensation setting was two stops higher than normal -- I never do that! Then, it dawned on me. I had recently been shooting exposure bracketed HDR, and I had forgotten to turn that mode off. Since I was shooting single images, instead of a rapid-fire sequence, my shots were under exposed, metered, and over exposed.
The moral of this tip is to always check your camera settings. You never know who might have set up something screwy in a previous shoot.
[Back to the Main Site]
Wednesday, October 24, 2012
Tuesday, May 15, 2012
Tip #104: Circles -- How to Make Them
A new feature on my website is Circles. The technique has been around for a long time, but I had not played with it until just recently. Here's a quick sample.

Here's how I make them:
There you go. Let your eyes be the guide for the amount of pinch and whirl that you apply.
The example, above, was orginally a simple shot of small colored tiles with white grout.
[Back to the Main Site]
Here's how I make them:
- I shoot ordinary subjects and look for colors that might work.
- I load the image into software that has Polar Coordinate filters, e.g. GIMP.
- I create a square crop.
- I convert the square crop to a circle with the Polar Coordinate filter.
- I apply the Whirl and Pinch filter or use iWarp or Liquify.
There you go. Let your eyes be the guide for the amount of pinch and whirl that you apply.
The example, above, was orginally a simple shot of small colored tiles with white grout.
[Back to the Main Site]
Monday, March 26, 2012
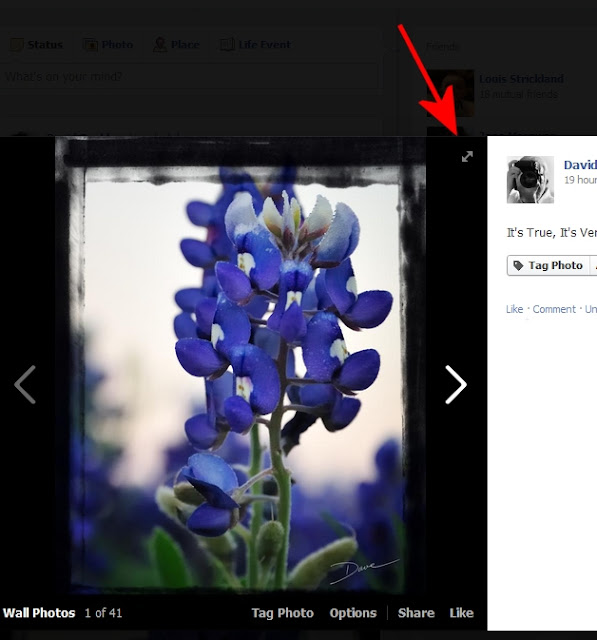
Tip #103: Full Screen View on Facebook
Image viewing on Facebook has changed several times in the last year. I have probably groaned each time a change has happened. Two recent changes, however, cause me to cheer. Images are now stored at full resolution and images can be viewed full-screen.
Here's how to use the feature, while on Facebook:
[Back to the Main Site]
Here's how to use the feature, while on Facebook:
- Click on an image of interest.
- When the image is displayed, hover your cursor over the image and notice the little double arrow in the upper right hand corner of the photo.
- Click on the double arrow, and the image will be displayed full-screen. Large images will fill the available screen space. Small images will be centered on the screen.

[Back to the Main Site]
Sunday, March 4, 2012
Tip #102: Macrophotography
There are many considerations for macrophotography, including lighting, contrast, subject motion, and others. There are special lenses, reverse mountings, and a slew of expensive options. However, most every camera has a close-up setting, often identified with a flower icon. That setting usually is a simple change of aperture setting to wide open, so that the shallow depth of field can be used to isolate the subject. Without any special equipment, you can take a decent close-up shot.
Filling the frame with your subject, can lead to pleasing, dramatic results. So can a close crop of an existing photo. Give it a try.

Note: This was shot with an iPhone, hand-held about two inches from the top of the can.
[Back to the Main Site]
Filling the frame with your subject, can lead to pleasing, dramatic results. So can a close crop of an existing photo. Give it a try.

Note: This was shot with an iPhone, hand-held about two inches from the top of the can.
[Back to the Main Site]
Sunday, February 26, 2012
Tip #101: Sandbagging, Literally
When you work with backdrop stands, light stands, and tripods, you will find that most everything you touch is top heavy. The stands are light but strong but can tip over and damage equipment or, worse, your clients. The answer is simple. Add a sandbag to the base of the stands to provide more stability. I use saddlebag type bags that can hold up to 20 pounds of sand. I found that each side of the bag will hold 2 quart-sized, ziplock, plastic bags filled with sand. The addition of the plastic bag liners keeps the sand in place and off the studio floor.
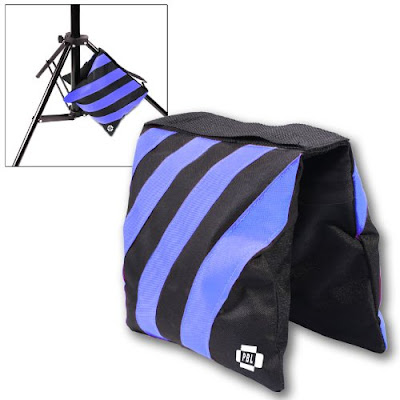
I bought mine on Amazon. Be sure you get the sand, locally; otherwise, the shipping costs will be heavy!
[Back to the Main Site]

I bought mine on Amazon. Be sure you get the sand, locally; otherwise, the shipping costs will be heavy!
[Back to the Main Site]
Thursday, February 23, 2012
Tip #100: Keep It Legal
If you are considering going pro, be sure you keep it legal. I am not talking about your subject matter, rather I'm speaking to the fact that if you sell photos, you will likely have taxes to pay on your sales.
When I looked into the process in Texas, I learned that failure to properly report such earnings comes with stiff fines -- up to $500 per day for each violation. So, I dutifully registered my photography business; I report sales on a quarterly basis; I collect sales taxes from my customers; and I promptly pay sales taxes as required by the state.
There is a bright side to all of this. I avoid the penalities of non-compliance, and I enjoy making tax-free purchases of business-related equipment, used exclusively for the production of photographic images. Note: I still pay sales tax on items for personal use.
Keep it legal; keep it honest; sleep well at night!
[Back to the Main Site]
Wednesday, February 22, 2012
Tip #99: Lights, Camera, Action
Studio lighting and lighting in general comes in many shapes, styles, and sizes. There are flash units, studio strobes, and continuous lighting options.
Regardless of the style lights that are used, their purpose is to light the subject so that the best color and detail can be shot with your camera. You have to balance your budget with your lighting needs.
I never said the hobby was inexpensive. Purchases can get pricey, especially if you are going pro.
[Back to the Main Site]
- Flash units are those that either fit on the hot shoe of your camera or mount on stands for off-camera use.
- Strobes are just fancy named flash units that are larger than the flash units that mount on your camera. Strobes are usually set on stands and have wired or wireless radio units that fire, when the camera shutter is pressed.
- Continuous lighting is just that. Instead of firing a flash of light, the lights stay on continuously, lighting your subject. Continuous lights come in both old-style, hot incandescent and modern, cool fluorescent.
Regardless of the style lights that are used, their purpose is to light the subject so that the best color and detail can be shot with your camera. You have to balance your budget with your lighting needs.
- Flash units are made by a variety of manufacturers for your specific camera type. Some can be triggered by wireless units or can have master-slave set-ups are are triggered optically. Check your camera manufacturer's web sites for recommendations.
- Strobes tend to provide more light than flash units but may be only a bit more expensive than high-end hot-shoe flash units. Elinchrom lights are highly recommended. I have seen them in action and some models, like the BXRi, have built-in wireless triggers.
- Continuous lights take much of the guess-work out of lighting arrangements, since you see the subject lighted, as your camera will see it. I use Westcott Spiderlight TD6's for my studio lights.
I never said the hobby was inexpensive. Purchases can get pricey, especially if you are going pro.
[Back to the Main Site]
Tuesday, February 21, 2012
Tip #98: Vibration Reduction
My telephoto lenses have vibration reduction capabilities, as defined on the Nikon USA website:
I turn VR on and never turn it off, even when using a tripod.
[Back to the Main Site]
Nikon VR II (Vibration Reduction) Image Stabilization Vibration Reduction, engineered specifically for each VR NIKKOR lens, enables handheld shooting at up to 4 shutter speeds slower than would otherwise be possible, assuring dramatically sharper still images and video capture.
I turn VR on and never turn it off, even when using a tripod.
[Back to the Main Site]
Monday, February 20, 2012
Tip #97: Lens Protection
On each of my lenses, I have attached essentially permanent lens protection -- I never take it off. When I compare the price of the protection to the price of the lens, the cost becomes insignificant. I don't leave home without it.
I use Promaster HGX clear filters.

[Back to the Main Site]
I use Promaster HGX clear filters.
[Back to the Main Site]
Sunday, February 19, 2012
Tip #96: It Belongs in the Bag
Lens covers belong in the bag.
Anytime one of my cameras is out of the bag, I must be shooting or about to shoot. As a result, the lens cover stays in the bag. Whenever a camera goes back in the bag, on goes its lens cover.
I miss fewer shots, using this technique.
[Back to the Main Site]
Anytime one of my cameras is out of the bag, I must be shooting or about to shoot. As a result, the lens cover stays in the bag. Whenever a camera goes back in the bag, on goes its lens cover.
I miss fewer shots, using this technique.
[Back to the Main Site]
Saturday, February 18, 2012
Tip #95: Collaboration, Just Do It!
This morning I met Paula, the artist that asked to paint one of my photographs. Peggy and I had a nice breakfast with Paula, her son, Michael, and his friend, Susan. After breakfast the painting was revealed. I was thrilled to see the finished piece. The result was a very flattering rendition of the bluebonnet shot that I captured, last spring.
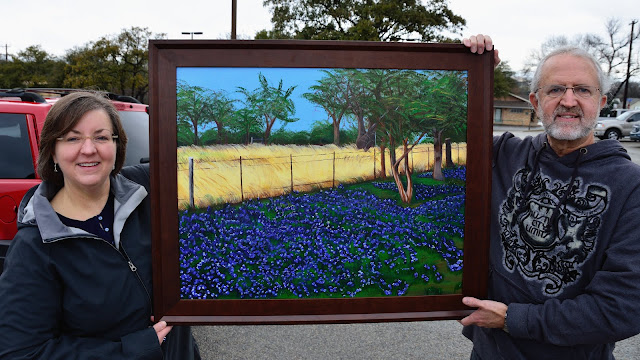
Paula, thanks for sharing. I look forward to future collaborations.
[Back to the Main Site]

Paula, thanks for sharing. I look forward to future collaborations.
[Back to the Main Site]
Friday, February 17, 2012
Tip #94: Breathe Deep
For an extra steady hold, maybe worth an additional f-stop, inhale before you compose your shot. Then, exhale about half your breath and press the shutter button. I learned this technique as a kid with a squirrel rifle, and it works just as well with a camera.
[Back to the Main Site]
[Back to the Main Site]
Thursday, February 16, 2012
Tip #93: Watch for the Blinkies
Now that I have you reviewing your photos more discretely with less chimping, I wanted to let you know that there is an excellent tool on most camera LCD displays that can be put to good use.
Check your manual for the overexposed view available on the LCD. This view will point out areas of the photo that are blown out by over exposure. The blown out areas will be blinking to point out missing data. To correct the exposure you can adjust your camera settings and retake the shot, or you could use the exposure conpensation button to reduce the exposure by fractions of an f-stop and retake your photo to correct the blinkies. On Nikon cameras the exposure control is marked (+/-) ans sits near the shutter button.
[Back to the Main Site]
Wednesday, February 15, 2012
Tip #92: Oooo, Oooo, Ahhh, Ahhh
Oh, the excited call of a primate. It's called "chimping".
In photography, chimping is the practice of looking at the LCD screen after every shot. There are pros and cons to the practice, and I will provide links to articles that discuss chimping in more detail. For me, the LCD screen is a distraction during shooting, especially in a theater or other darkened environment. When the image pops up on the screen, my night vision is destroyed, and I am sure that my brightly illuminated face behind the camera is a distraction to my subject. So, I purposefully turn off the default setting that displays an image immediately after it is taken. My strategy is to trust my camera and my abilities, and I choose to review images more discretely to avoid the distraction.
I have not always followed this practice, and I can be seen chimping from time to time, as I verify settings. The positive side of chimping is that you quickly learn what works and does not. Once you learn the settings that work, you develop confidence in yourself and in your equipment. My advice, use the LCD on your camera to learn, then use it as the tool that it is in a way that makes sense to you. Don't let it be a distraction to the point that you miss an important shot.
On the pro-side of the issue: "Chimping Your Way to Better Photography"
On the con-side of the issue: "10 Reasons Why You Should Never Chimp While Shooting Street Photography"
And the argument drones on like religion or politics, see Greg's article and the follow-up comments: "Stop Chimping - Photography Quick Tip #5"
[Back to the Main Site]
Tuesday, February 14, 2012
Tip #91: Camera Settings
I am a Nikon shooter. I own a D7000 and a D3S. Both cameras are set to preferences that I use on a regular basis.
Happy Valentine's Day!

[Back to the Main Site]
- Auto means "everything" is auto, including flash (D7000, only; D3S has no auto setting)
- A (aperture priority) -- ISO 200, aperture is adjusted by me, shutter speed is calculated
- S (shutter priority) -- ISO 200, shutter is adjusted by me but defaults to 1/1000 sec, aperture is calculated
- P (program mode) -- ISO 400, shutter 1/250 sec, aperture is adjusted by me
- M (manual) -- I set ISO (default 200), I set shutter speed (default 1/125 sec), I set aperture, based on internal meter readings.
Everything else I do by feeling the light.
Happy Valentine's Day!

[Back to the Main Site]
Monday, February 13, 2012
Tip #90: How to Hold Your Camera
How do you hold your camera? Does it make a difference? With point-and-shoots you nearly always see folks holding their cameras at arm's length and squinting to get the right composition with LCD screen on the back of the camera. You see smartphone users trying to wobble and move their camera into just the right position for a less than good shot. Incorrectly holding a DSLR with a long, heavy lens will not create the best of shots. In fact, because DSLR's are heavier, the extended-arm position will create many bad shots.
When I shoot, I look for ways to support both lens and body, and I try to tuck in my elbows to provide additional support. This self-portrait shows what I mean.

The more stable you can be, the better your shots will be. As with most things, these days, here's another article on the topic, http://improvephotography.com/1365/how-to-properly-hold-a-dslr-camera/.
Here's a video that goes into even more detail.
[Back to the Main Site]
Sunday, February 12, 2012
Tip #89: Browser to Full Screen
In the old days (late 70's, early 80's), I shot a lot of slide film. I would go to the darkroom, develop the negatives, cut the film, and mount the individual slides into slide holders. Unless I was printing, I didn't look at the slides through an enlarger. Instead, I would sort the good from the bad using a back-lit slide viewer. The good ones would go into a slide tray and straight to the projector for enlarged viewing.
These days, digital images can be viewed as thumbnails in image editing software or as full screen images. Using ViewNX, the full screen view is just a double click away.
[Back to the Main Site]
These days, digital images can be viewed as thumbnails in image editing software or as full screen images. Using ViewNX, the full screen view is just a double click away.


[Back to the Main Site]
Saturday, February 11, 2012
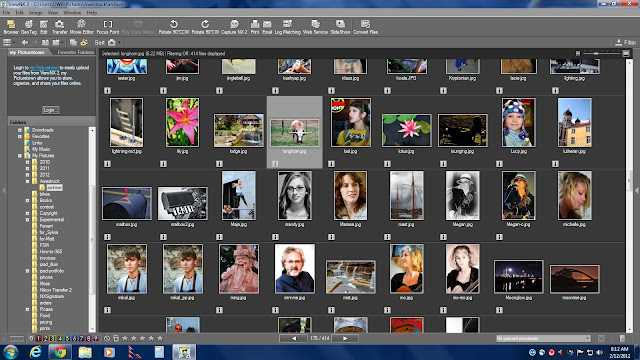
Tip #88: Streamlining Your Workflow
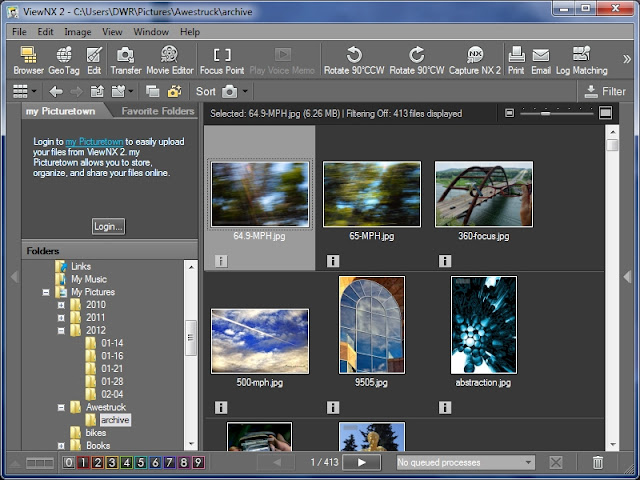
Many photo editors allow you to open images with other tools. Lightroom and ViewNX are two that allow this procedure for plug-ins and helper applications. This example is based on ViewNX, the free editor from Nikon.
Open the ViewNX application and choose the folder to view.
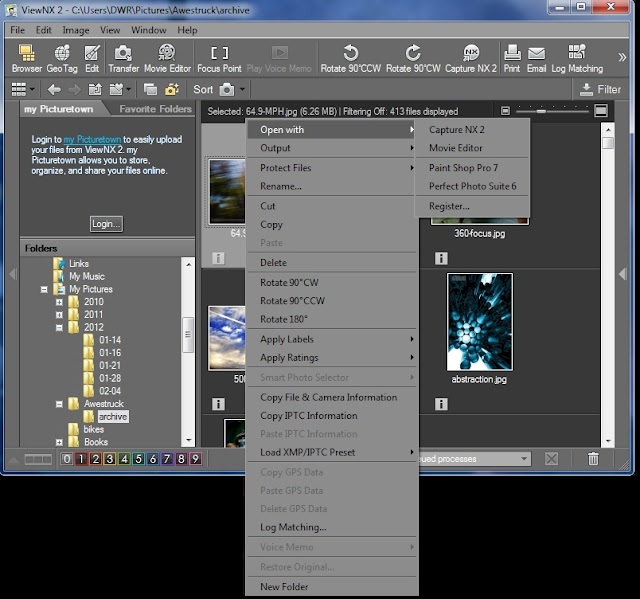
Then, right click on an image, and you will be offered several choices, including opening the image with a helper application of your choice.
Choose register, and you will be given the option to add a new helper program.
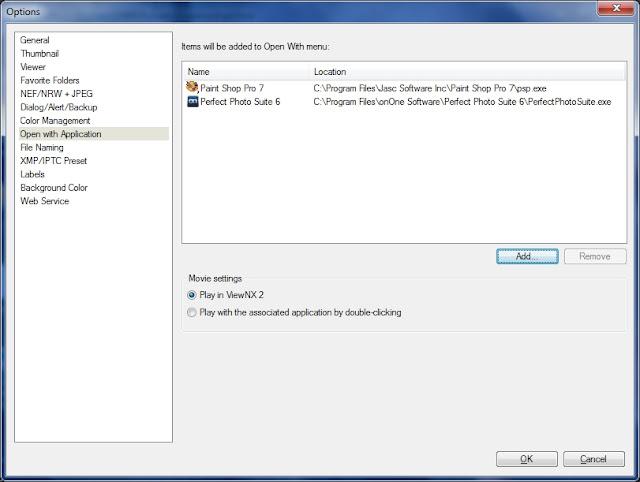
Having the tools right at your mouse-tip will help streamline your editing workflow.
[Back to the Main Site]
Open the ViewNX application and choose the folder to view.

Then, right click on an image, and you will be offered several choices, including opening the image with a helper application of your choice.

Choose register, and you will be given the option to add a new helper program.

Having the tools right at your mouse-tip will help streamline your editing workflow.
[Back to the Main Site]
Friday, February 10, 2012
Tip #87: Reusing Settings
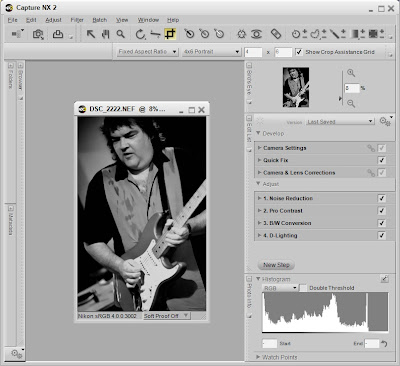
Suppose you spend several minutes creating just the right effect for a photo, and say that you have other photos from the same shoot. Wouldn't it be nice to be able to apply the same settings to another photo? Capture NX2 allows this (as do other editors). Here are examples, showing how it can be done in NX2.
Get the settings just right:
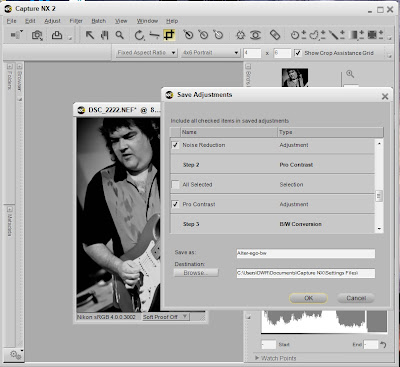
Save the settings:
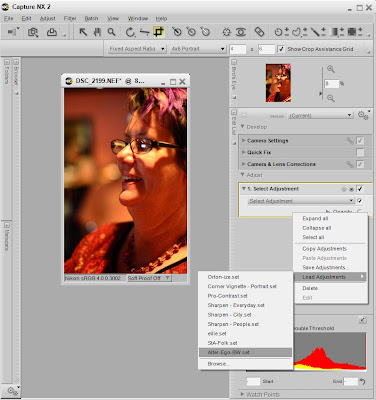
Apply settings on a different photo:
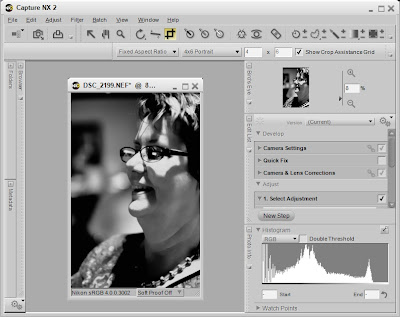
This feature is a definite time saver.
[Back to the Main Site]
Get the settings just right:

Save the settings:

Apply settings on a different photo:


This feature is a definite time saver.
[Back to the Main Site]
Thursday, February 9, 2012
Tip #86: The Golden Ratio
Have you ever had an image appeal to you, and you could not put your finger on the reason? There is some science behind that impression. Check out the article on the Golden Ratio. Whew, was that a tough read or what?
Seeing it is very much easier than reading about it. For example:

If you would like to investigate some of your own images, there's a site for that: dcolegrovephotography.com. Upload some of your shots, you may be surprised at how well your images measure up.
[Back to the Main Site]
Seeing it is very much easier than reading about it. For example:
If you would like to investigate some of your own images, there's a site for that: dcolegrovephotography.com. Upload some of your shots, you may be surprised at how well your images measure up.
[Back to the Main Site]
Wednesday, February 8, 2012
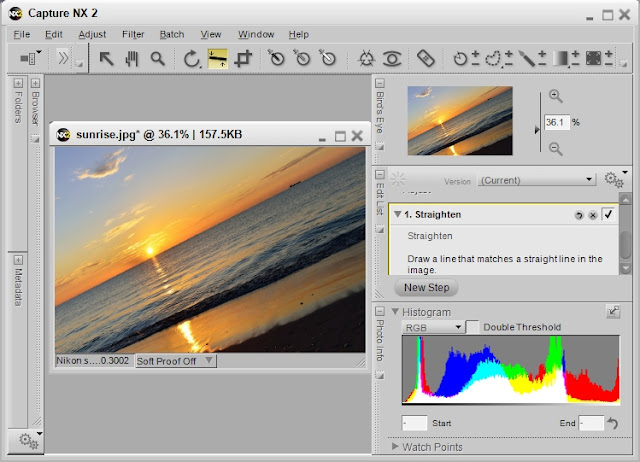
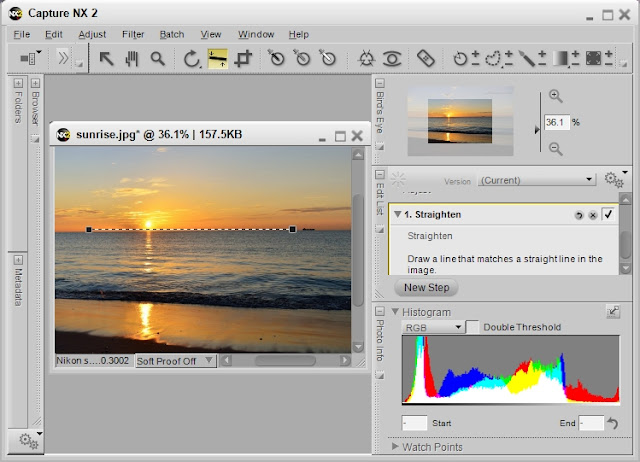
Tip #85: Image Straightening
When it comes to straightening photos, I think I have seen most of the user interfaces for completing the task. There are dialog boxes for entering a number of degrees; there are grids to align; there are twirly things to click and rotate; there are sliders; and there are lines to draw.
In my opinion, drawing a line on either a crooked horizon or a vertical edge that needs straightening is about the simplest of the user interfaces. In Capture NX2 that is the technique that I use. Here are the before and after images of my editor in action.
Presto change-o! no muss, no fuss.
Note: Just so you know, I exaggerated the angle in the "before" image to make the point clear. My actual adjustment to the horizon in the original photo was less than a degree.
[Back to the Main Site]
In my opinion, drawing a line on either a crooked horizon or a vertical edge that needs straightening is about the simplest of the user interfaces. In Capture NX2 that is the technique that I use. Here are the before and after images of my editor in action.


Presto change-o! no muss, no fuss.
Note: Just so you know, I exaggerated the angle in the "before" image to make the point clear. My actual adjustment to the horizon in the original photo was less than a degree.
[Back to the Main Site]
Tuesday, February 7, 2012
Tip #84: Crop Tool
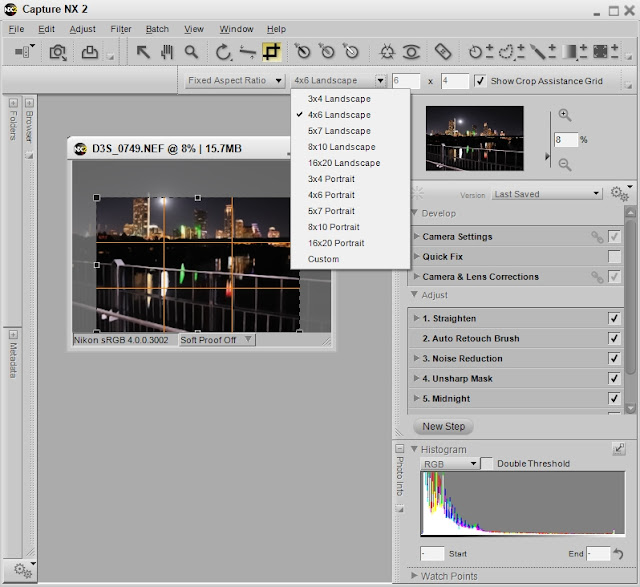
In Tips 14 and 23 I discussed cropping. This article will describe how the crop tool in Capture NX2 can be used to your advantage. The tool has two modes Free and Fixed Aspect ratio.
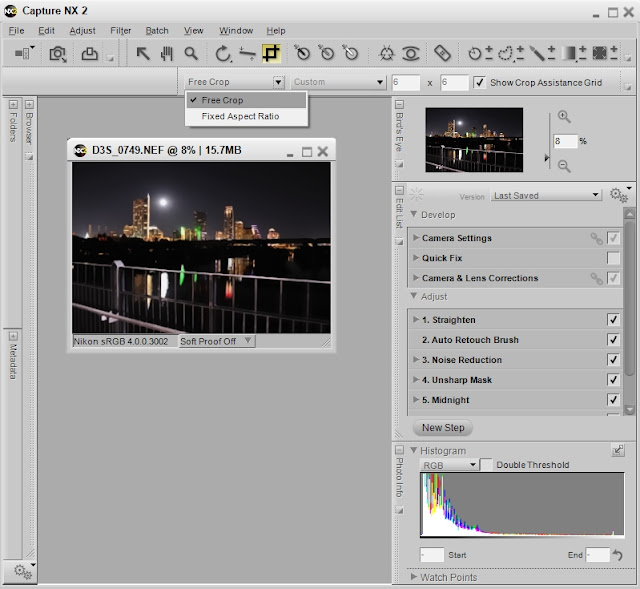
In Free, anything goes. You choose the shape of the rectangular crop.
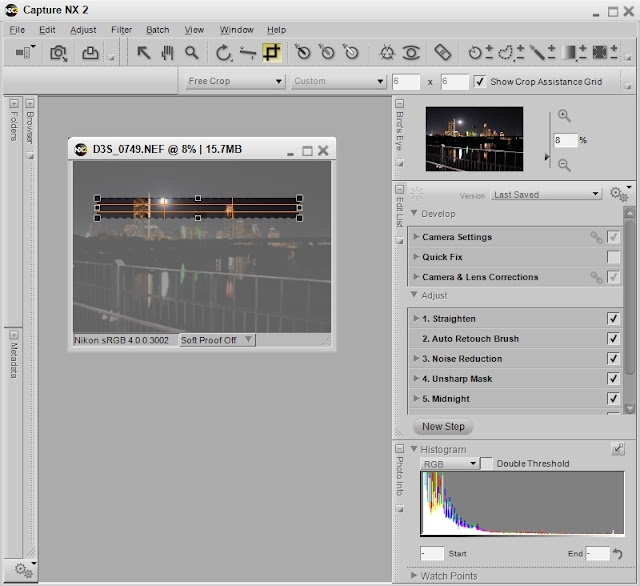
In Fixed Aspect mode, the proportions of the sides are kept constant. You can choose popular ratios or set your own.
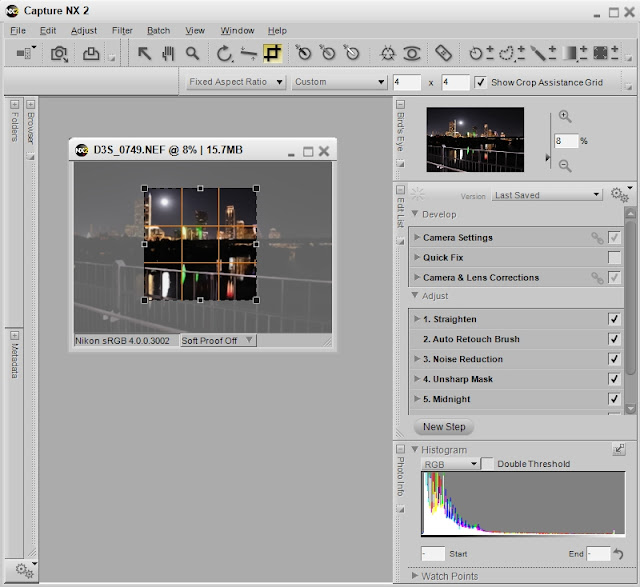
You can set the sides the same and create a square crop.
You can create a cinematic aspect by setting the sides to a 16x9 ratio.
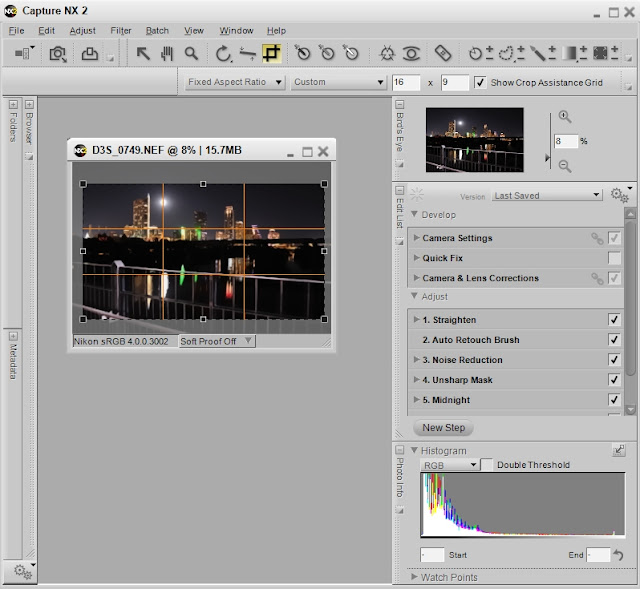
Cropping should no longer be a mystery.
[Back to the Main Site]

In Free, anything goes. You choose the shape of the rectangular crop.

In Fixed Aspect mode, the proportions of the sides are kept constant. You can choose popular ratios or set your own.

You can set the sides the same and create a square crop.

You can create a cinematic aspect by setting the sides to a 16x9 ratio.
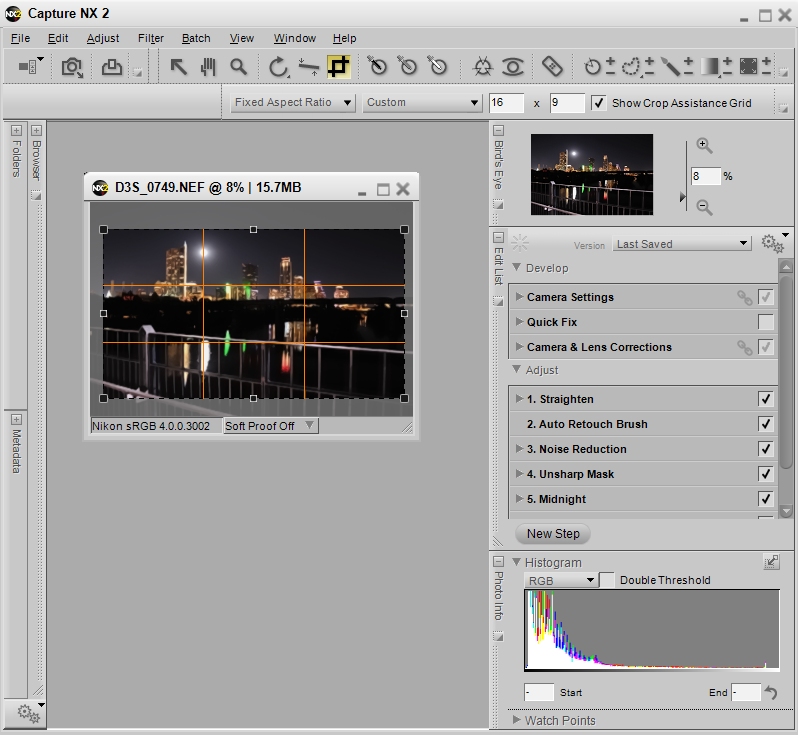
Cropping should no longer be a mystery.
[Back to the Main Site]
Monday, February 6, 2012
Tip #83: Shooting Sports
So you wanna shoot sports. Sports photography, done well, is an expensive proposition. You need a high frame rate camera $$$$; you need fast lenses $$$$; you need long glass to get to the action $$$$; and you need to understand the sport you are shooting, so you can get the $money$ shot. Here are the basics:
In my opinion, Scott Kelby is one of the best at shooting sports. See his work at ScottKelby.com

Photo -- Scott Kelby
[Back to the Main Site]
- Because sports include fast moving participants, you need a camera that can take several frames per second, while auto-focusing. I would recommend 6-12 frames per second. Faster is always better in this case. Nikon and Canon seem to be the winners for professional sports photographers.
- Fast lenses are those that work in low light and have fast, auto-focus capabilities. I would not consider a lens in this category without an aperture setting of at least f/2.8.
- Long glass is 200mm or longer. I think 300 to 400mm may even be better. Wikipedia agrees.
- Understanding the sport -- well, that's just common sense.
- Your camera settings should be set to shutter priority with the shutter speed set to 1/1000 of a second to freeze the action. ISO may be set on AUTO but be aware that more noise is introduced as ISO values go up. The sweet spot for ISO differs for each camera, so check your manual.
- You will need the fastest memory cards you can buy.
- If you shoot for a service, you will probably want to shoot jpeg versus raw, so you can get your shots uploaded quickly.
- Shoot in burst mode and select your favorite shots from the string of shots.
- Pan with the action.
- Be prepared to be in the middle of the action for fast moving, full contact sports.
- Remember, good shots sell; bad shots just show up on the web.
Photo -- Scott Kelby
[Back to the Main Site]
Sunday, February 5, 2012
Tip #82: Sharpening
I was going to write a long article, explaining the in's and out's of photo sharpening, and how to use the Unsharp Mask. Thanks to the Internet, I found an excellent explanation that I happen to like. Check out Photojojo.com. If you are partial to Wikipedia, they have an article on the topic, too.
[Back to the Main Site]
[Back to the Main Site]
Saturday, February 4, 2012
Tip #81: It's Noisy, Now What
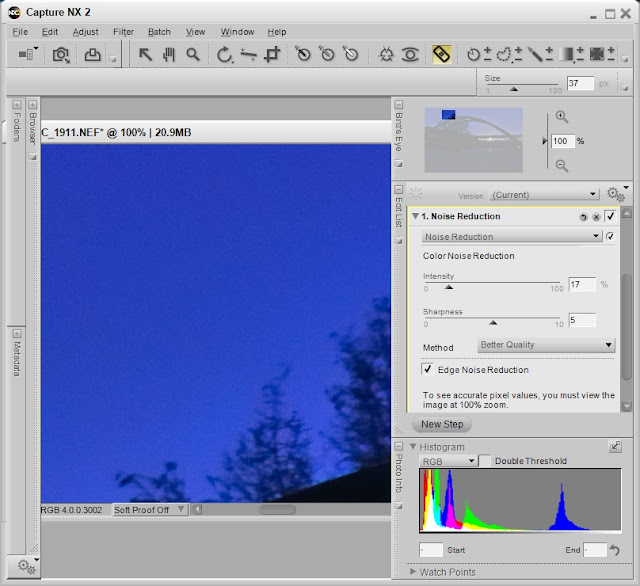
It is rare that you take a photo and not have some noise present. There are all kinds of noise or speckles in photos. Removing noise is usually the first step in my editing workflow. Here's how I remove some of the noise, using the Capture NX2 editor.
Before noise reduction:

After noise reduction:
[Back to the Main Site]
- Load the image and zoom-in to 100% (CTRL-ALT-0 is the keyboard short-cut).
- Choose the Noise Reduction tool.
- Choose Better Quality method and Edge Noise Reduction.
- Leave the sharpness slider set on 5.
- Adjust the Intensity slider to the right just until the image noise is reduced.
- View the entire image (click on the hand icon).
- Continue with additional edits or save the image.
Before noise reduction:

After noise reduction:

[Back to the Main Site]
Friday, February 3, 2012
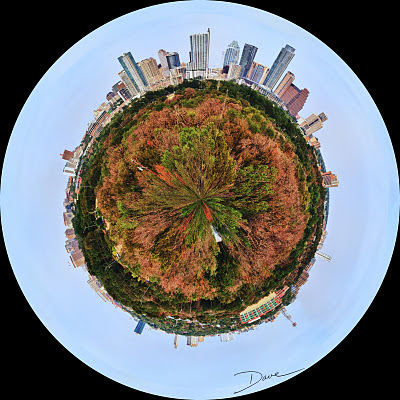
Tip #80: It's a Small World
On Saturday, I posted the following image -- a panorama on a sphere:
Yesterday, someone asked me how I did it. So, here goes.
[Back to the Main Site]
Yesterday, someone asked me how I did it. So, here goes.
- I shot a nine-frame panorama, overlapping each frame by about 20%. Any camera will work, but in this case I used one of my DSLR's. I took the images handheld, but a tripod might have been better. A full circle panorama might have been better for the spherical projection, but it is not a requirement.
- I stitched the 9 frames together with Microsoft ICE (Tip #34) and saved the new image.
- I loaded the panorama into GIMP. Photoshop would also have worked.
- I re-scaled the image proportions to a square (5000 pixels x 5000 pixels) with Image->Scale Image.
- I transformed the image with Filter->Distorts->Polar Coordinates
- I cleaned up my planet with a healing brush.
- I left the corners untouched for a dramatic round presentation on my black backgrounded blog.
- I saved the new image, naming it "Austeroid."
Text not enough? Here's a Youtube video that shows the Photoshop version of the transformation.
[Back to the Main Site]
Thursday, February 2, 2012
Tip #79: Break the Rules
Remember the tip that suggested the "Rule of Thirds?" Well, I am here to tell you that by knowing the rule, you are now free to break it. What? That's right, rules in photography are not really rules, rather they are guidelines to help you develop your skills.
Freedom is a powerful thing. Be creative with your art but be responsible!
[Back to the Main Site]
Freedom is a powerful thing. Be creative with your art but be responsible!
[Back to the Main Site]
Wednesday, February 1, 2012
Tip #78: Moving Pictures
No photographer's repertoire is complete without knowing a little about video. Why? Well, your customers are going to expect it, plus the technology is almost universal. I have it on my phone; I have it on a video camera; I have it in my DSLR's; I have it on the web -- video is everywhere.
There are free video editors on both PC's and Mac's; there are shareware video editors; and there are packages to buy. The price range is almost as varied as the sources of video, themselves. I use a consumer suite from Pinnacle software. It handles many input formats and can create output in most of the popular formats, including full HD.
Be prepared for a fairly steep learning curve. Fortunately, the duration of the curve is not too long. The effort will be worth it.
[Back to the Main Site]
Tuesday, January 31, 2012
Tip #77: From the Seminar
Yesterday, I attended Scott Kelby's "Light It, Shoot It, Retouch It" seminar. Five hundred of us were taught and entertained by Scott and his staff, as Scott went through the steps in the different processes. I learned a good deal about setting up portrait sessions with live models, product shoots, and how to retouch each of the styles. The seminar was balanced between lighting arrangements and the use of Photoshop to retouch and produce the final images. I also learned about tethered shooting and why it is important in the studio -- a two inch screen on the back of a camera is just not large enough to make good lighting decisions. I can definitely recommend attending one of Scott's seminars, if you get the chance.
As with most seminars, there was an opportunity to hear about new products coming to the market to make photo editing chores less tedius. Two vendors jumped out at me. I recomend a visit to both companies' websites.
[Back to the Main Site]
As with most seminars, there was an opportunity to hear about new products coming to the market to make photo editing chores less tedius. Two vendors jumped out at me. I recomend a visit to both companies' websites.
- onOne Software and their latest product suite, and
- Topaz Labs and their latest offerings.
[Back to the Main Site]
Monday, January 30, 2012
Tip #76: More Organization -- HTML Tables
What if you need more than bullets and enumerations to explain a complex task? The answer may be tables. You know, rows and columns of information. Here's how you can add a table to your blog page, and, you've guessed it -- a future article will explain a complex task with lots of information. Instead of too much text, I will display the how-to in a table.
First, here's the sample table:
Next, here's the code, used to create the table:
<table border="5">
<tr>
<td>X</td> <td>O</td> <td>X</td>
</tr>
<tr>
<td>O</td> <td>X</td> <td>O</td>
</tr>
<tr>
<td>O</td> <td>O</td> <td>X</td>
</tr>
</table>
Tables can be useful for text as well as for images. Additional details on the use of html tables can be found at W3Schools.com.
[Back to the Main Site]
First, here's the sample table:
| X | O | X |
| O | X | O |
| O | O | X |
Next, here's the code, used to create the table:
<table border="5">
<tr>
<td>X</td> <td>O</td> <td>X</td>
</tr>
<tr>
<td>O</td> <td>X</td> <td>O</td>
</tr>
<tr>
<td>O</td> <td>O</td> <td>X</td>
</tr>
</table>
Tables can be useful for text as well as for images. Additional details on the use of html tables can be found at W3Schools.com.
[Back to the Main Site]
Sunday, January 29, 2012
Tip #75: Lists on Blogs
Sometimes, when writing articles or tips or notes, you need to enumerate the steps to a solution or list bullet points to emphasize the main points of your discussion. In this collection of "how-to's" I have used both kinds of lists, and I have wondered out loud, why the blog editing tools do not have bullets and lists included. Here are examples of each and the code needed to make them. The tags are simple and differ, only, by a single letter: <ol> or <ul>:
Ordered list (enumerated):
<ol>
<li>Lorem ipsum dolor sit amet, consectetur adipiscing elit.</li>
<li>Nulla semper nulla ut quam fermentum vel vulputate est ultricies.</li>
<li>Donec at diam sit amet justo fermentum pulvinar ut a nisi.</li>
</ol>
Unordered list (not numbered):
<ul>
<li>Pellentesque quis libero vel ipsum cursus tincidunt.</li>
<li>Phasellus facilisis enim id tellus ornare vestibulum.</li>
<li>Nunc pretium arcu ut felis elementum ut viverra mi faucibus.</li>
</ul>
I hope this helps you get your points across!
[Back to the Main Site]
Ordered list (enumerated):
- Lorem ipsum dolor sit amet, consectetur adipiscing elit.
- Nulla semper nulla ut quam fermentum vel vulputate est ultricies.
- Donec at diam sit amet justo fermentum pulvinar ut a nisi.
<ol>
<li>Lorem ipsum dolor sit amet, consectetur adipiscing elit.</li>
<li>Nulla semper nulla ut quam fermentum vel vulputate est ultricies.</li>
<li>Donec at diam sit amet justo fermentum pulvinar ut a nisi.</li>
</ol>
Unordered list (not numbered):
- Pellentesque quis libero vel ipsum cursus tincidunt.
- Phasellus facilisis enim id tellus ornare vestibulum.
- Nunc pretium arcu ut felis elementum ut viverra mi faucibus.
<ul>
<li>Pellentesque quis libero vel ipsum cursus tincidunt.</li>
<li>Phasellus facilisis enim id tellus ornare vestibulum.</li>
<li>Nunc pretium arcu ut felis elementum ut viverra mi faucibus.</li>
</ul>
I hope this helps you get your points across!
Note: Here's a quick follow-up. I was working with my blog tool, blogger.com, when I realized that I always write in the "edit html" mode. When I accidentally clicked on "compose" mode, guess what I found. I found buttons to automatically add ordered and unordered lists -- imagine that. The moral of the story is, don't get stuck in a rut!
[Back to the Main Site]
Saturday, January 28, 2012
Tip #74: Simple Masks
We all wear them. They hide what we don't want seen. The same applies to photo composites -- images made up of more than one picture. Masks can be complex or simple. They can range from merging gradients or just shapes that block-off a portion of a picture. In a recent posting, I created a triptych, using three photos, a layer for each, a mask for each layer, and a background layer. My layers were named background, top, left, and right, so I could keep track of where the photos should be placed. Why all the trouble? Well, with the different layers and their masks, I can drop photos onto the different layers without disturbing the other parts of the image. It is like stacking the different images (layers) with restricted views (masks) of the different layers.
Here are the steps.
Note: This example was done with Paint Shop Pro, but the steps apply to whichever layers-capable editor that you might be using.
[Back to the Main Site]
Here are the steps.
- Create basic layout.

- Create mask for each portion of the image, top, left, and right.


- Save the layers for use as a template, which can be rotated, enlarged, or used, as is, for future composites. This is usually the native file type, used by your editor; jpeg files do not save the layers, just the merged result.
- Add each image to its own layer.
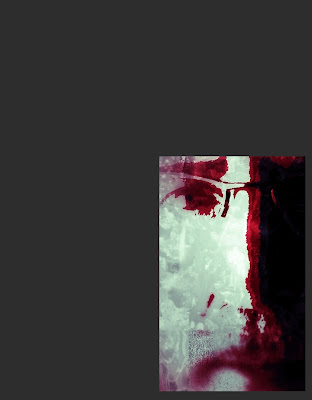
- Add or change the background color with the flood fill tool.
- Save the final image, merging all the layers.


Note: This example was done with Paint Shop Pro, but the steps apply to whichever layers-capable editor that you might be using.
[Back to the Main Site]
Friday, January 27, 2012
Tip #73: Spot Removal
Technology has changed the way we edit photos. New improvements to editors have taken some of the pain away. For instance, spot and blemish removal used to require painstaking recoloring at the pixel level. Then, the clone stamp brush was created. With this tool you copied a small region of your photo, near the spot, and you copied the similar region to overlay the spot. Again, this was tedious at best.
Modern editors now have sophisticated improvements that remove spots with a single click. You adjust the size of the brush, click on the spot to be removed, and the tool blends the spot away. When you open your editor, look for retouching tools. For example:
If you care to see sample tutorials, check out www.nikonusa.com or try the Lightroom tutorial.
[Back to the Main Site]
Modern editors now have sophisticated improvements that remove spots with a single click. You adjust the size of the brush, click on the spot to be removed, and the tool blends the spot away. When you open your editor, look for retouching tools. For example:
- In Google's Picasa the spot removal tool is called Retouch.
- In Adobe's Photoshop the tool is called Spot Healing
- In Adobe Lightroom the tool is Spot Removal
- In Nikon's Capture NX2 the tool is Auto Retouch Brush
If you care to see sample tutorials, check out www.nikonusa.com or try the Lightroom tutorial.
[Back to the Main Site]
Thursday, January 26, 2012
Tip #72: More Photographic Training

In previous tips I have described the pros that I follow. I have provided links to their sites, and I have offered up camera maker sites that provide tutorials. I would be remiss in not pointing you to specific sites that I use to learn more about my blossoming craft.
My favorite trainer is Scott Kelby. Scott has blogs and sites that offer free and paid-for instruction. Scott also does nationwide tours. In fact, I am attending his "Light It, Shoot It, Retouch It -- Live" seminar in Austin on Monday. I am sure I will come out of that training with a whole set of skills for which I was previously unaware. I am looking forward to 8 hours with Scott.
- For starters and for free tips try KelbyTV.com
- For more in-depth, but paid-for instruction, try KelbyTraining.com
- And, if you get a chance attend one of his live seminars. I'll have more to say on this topic, next week.
Note to Boss: Yes, I am taking a vacation day.
[Back to the Main Site]
Wednesday, January 25, 2012
Tuesday, January 24, 2012
Monday, January 23, 2012
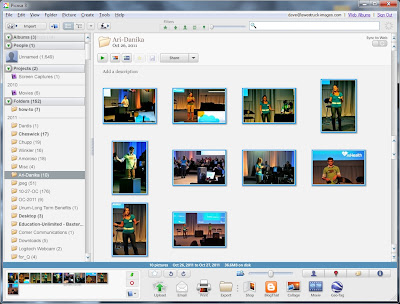
Tip #69: Use Picasa to Date-Stamp Your Photos
If you are sharing photos online or as prints and you want your audience to know the date or event, where the photos were taken, here's a quick how-to for adding a that information to your photos, using Picasa, the free photo editor from Google.
1. Open Picasa and go to your directory of choice:
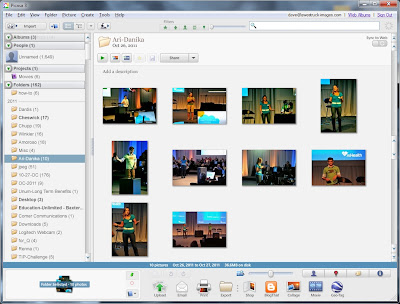
2. Select the images to export:
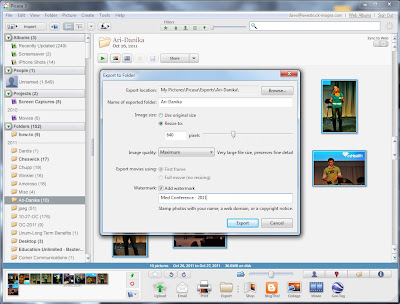
3. Choose File | Export

4. Complete the Export dialog and click Export:
5. View the results:

Easy, huh?
[Back to the Main Site]
1. Open Picasa and go to your directory of choice:

2. Select the images to export:

3. Choose File | Export

4. Complete the Export dialog and click Export:

5. View the results:

Easy, huh?
[Back to the Main Site]
Sunday, January 22, 2012
Tip #68: Shooting Flowers
Some say, buy a pretty flower, bring it home, arrange it just so, shoot it against a black background, shoot it against a white background, or some other "recipe"; but I prefer to shoot flowers in their natural state. I do have to put up with wind and bugs and somewhat trying conditions to get the best angle, but I think it is worth the trouble.
I look for nice color contrasts, and I usually shoot with a telephoto lens. I try to capture images up close and with an unusual angle to be different. Just like shooting children, I try to get on the same level as the flower. This shot was captured near sundown. The setting sun was illuminating the flower, while the blue sky was providing a rich backdrop. The sunflower called to me.

For this shot my settings on a Nikon D40X with 55-200mm F/4-5.6G lens were 122mm, F/5, 1/250s, ISO 200.
[Back to the Main Site]
I look for nice color contrasts, and I usually shoot with a telephoto lens. I try to capture images up close and with an unusual angle to be different. Just like shooting children, I try to get on the same level as the flower. This shot was captured near sundown. The setting sun was illuminating the flower, while the blue sky was providing a rich backdrop. The sunflower called to me.
For this shot my settings on a Nikon D40X with 55-200mm F/4-5.6G lens were 122mm, F/5, 1/250s, ISO 200.
[Back to the Main Site]
Saturday, January 21, 2012
Tip #67: Camera Manuals in the Field
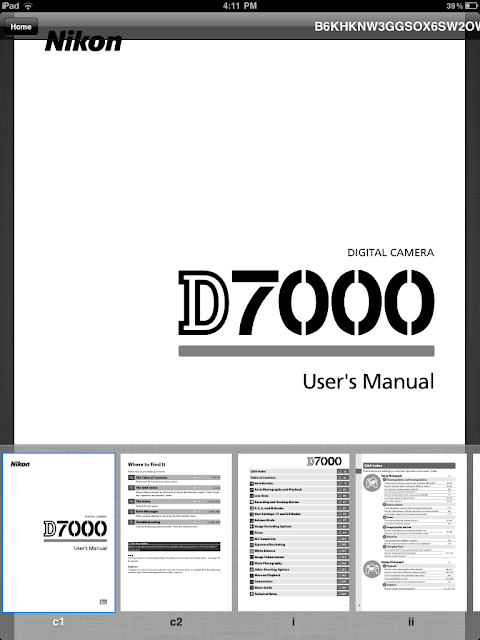
You are traveling to the field to shoot a project. You remember that your camera had the necessary feature, but you cannot find the menu to set up the feature -- if only you had brought the camera manual. You know that 150 page document that you saw in the box, when you brought your new camera home.
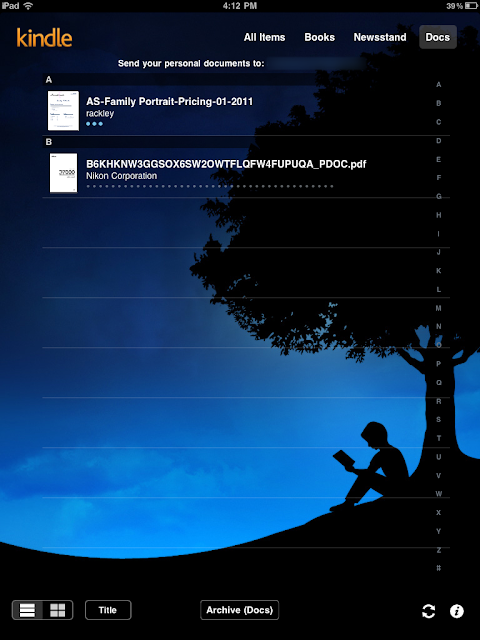
Well, kindle -- I happen to use the kindle app on an iPad -- has come to the rescue. A recent update allows you to upload personal documents and PDF files straight into your kindle-reader. I just uploaded the PDF versions of my camera manuals to my kindle account. It was as easy as sending an email -- in fact that's all you have to do.
Detailed instructions are on Amazon.com.
[Back to the Main Site]
Well, kindle -- I happen to use the kindle app on an iPad -- has come to the rescue. A recent update allows you to upload personal documents and PDF files straight into your kindle-reader. I just uploaded the PDF versions of my camera manuals to my kindle account. It was as easy as sending an email -- in fact that's all you have to do.


Detailed instructions are on Amazon.com.
[Back to the Main Site]
Friday, January 20, 2012
Tip #66: File Storage and Sharing
Have you ever needed a place to store your photos, so you could get to them from anywhere? That need was answered for me by www.dropbox.com. You can create folders for your files, then share those folders with as many or as few as you like.
Creating an account is free, and you instantly get 2GB of storage. As folks login to retrieve your shared files, you get additional 250 MB added to your account. If you need more storage, then you can purchase it 50GB chunks.
Uploading files is easy via either a web interface or a desktop files manager interface. The latter being as easy as drop-and-drag.
Be sure to watch the introductory video to get the "big picture".
[Back to the Main Site]
Thursday, January 19, 2012
Tip #65: Vignette, Oui, Oui
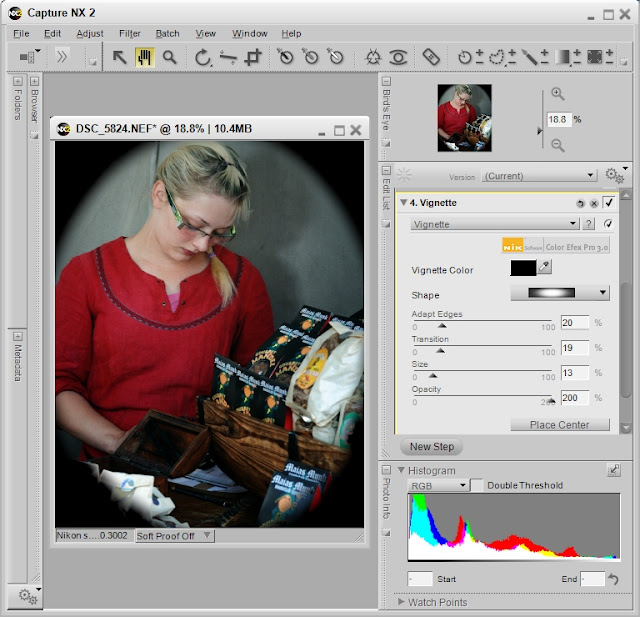
Oh Vignette, you are sassy and tart. Too much and you are obvious, too little and the eyes stray, but just right and you are so, so subtle. In photography, vignetting is the darkening of the outer edges of an image, so that the viewer's eyes are kept on the subject of the photograph. Done well, and the effect is barely noticeable. Done poorly and you have nothing but a dark circles around the edges of your images.
Here is an example of an exaggerated vignette. It is purposefully done poorly to identify the effect.
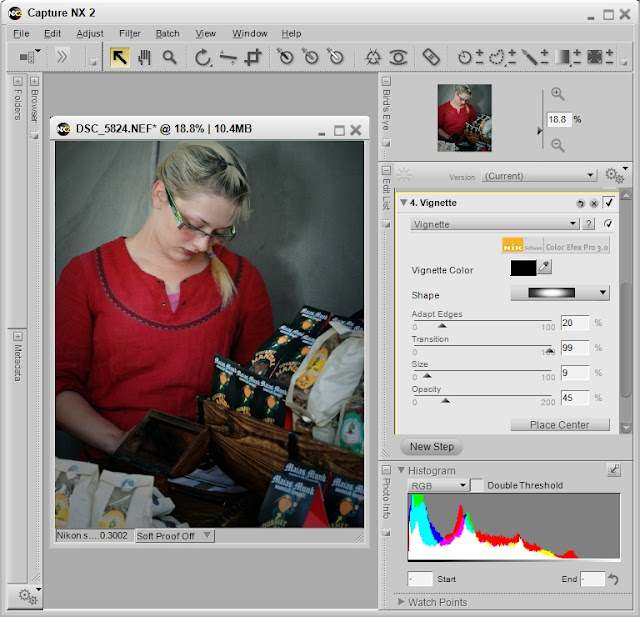
Here's an example that is a bit more subtle.

Here's the effect done just to my liking.
BTW, I used my main editor, Capture NX2, for these examples.
[Back to the Main Site]
Here is an example of an exaggerated vignette. It is purposefully done poorly to identify the effect.

Here's an example that is a bit more subtle.

Here's the effect done just to my liking.

BTW, I used my main editor, Capture NX2, for these examples.
[Back to the Main Site]
Wednesday, January 18, 2012
Tip #64: Curves Tool
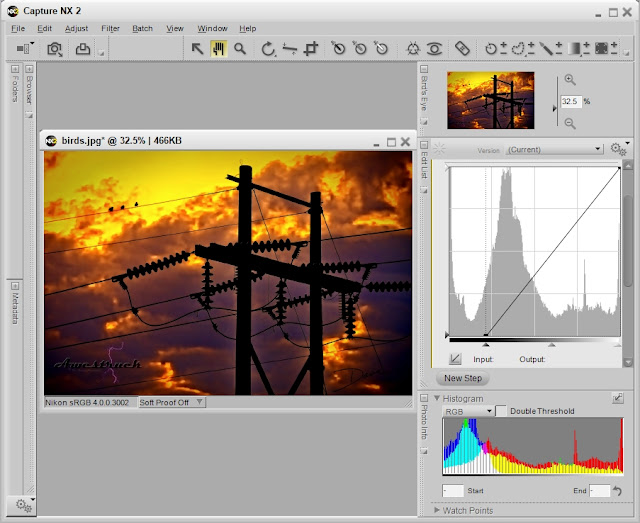
Most higher-end, image editing software has a powerful tool called curves. The mathematical nature of the tool seems intimidating, so some avoid trying it. In simple terms the curve(s) tool displays and allows changes to the relationship of input to output tonal values. Scary, huh? With the following examples, I hope to take the scary out.
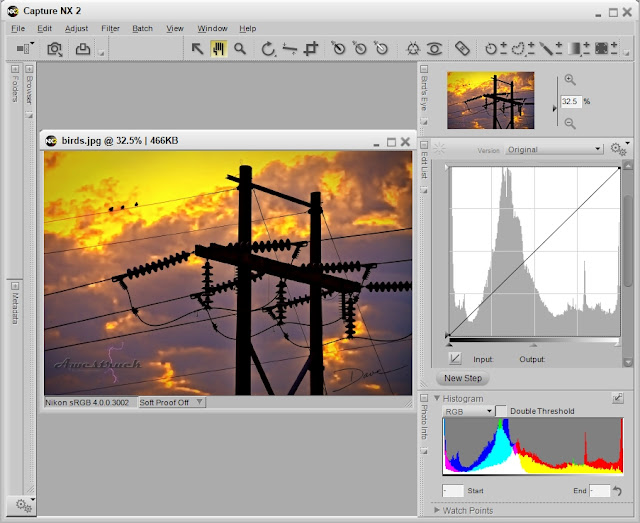
When an image is first opened, the curves tool displays a straight-line relationship, overlaying the histogram of the image. In other words the input tonal values of an image matches the output tonal values. The following screen shot from Capture NX2 shows this relationship.
You can lighten an image by adjusting the far right slider on the bottom toward the middle.
You can darken an image by moving the far left slider on the bottom toward the middle.
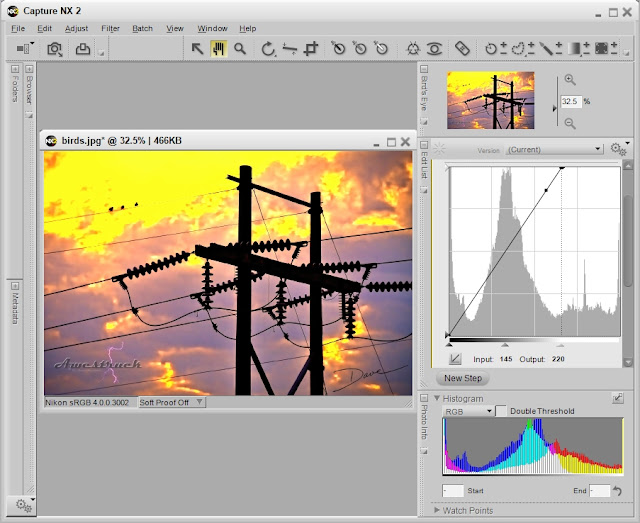
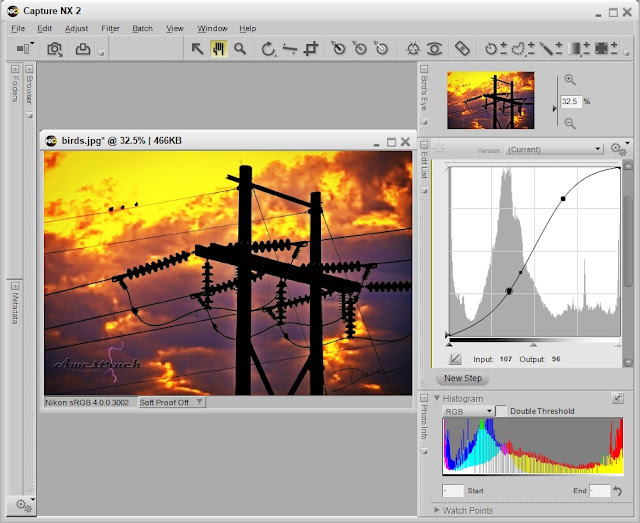
For portraits, an S-curve is often used. Just click on the line and adjust it to form an s-shape.
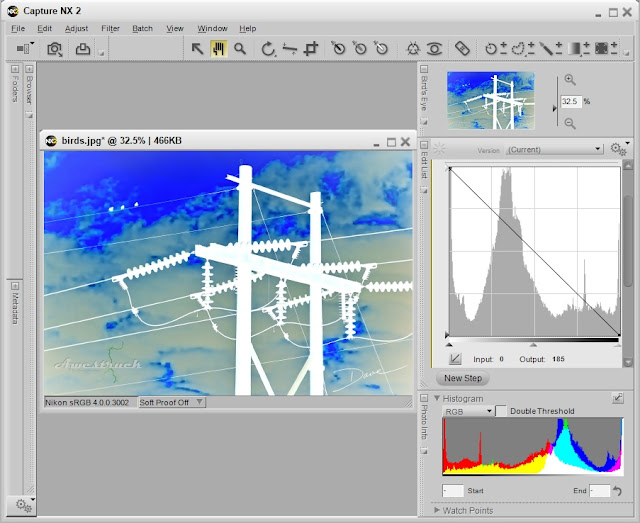
You can create a negative of your image by moving and reversing the end points of the line, until you have a negative slope -- oops, there's some math, again.
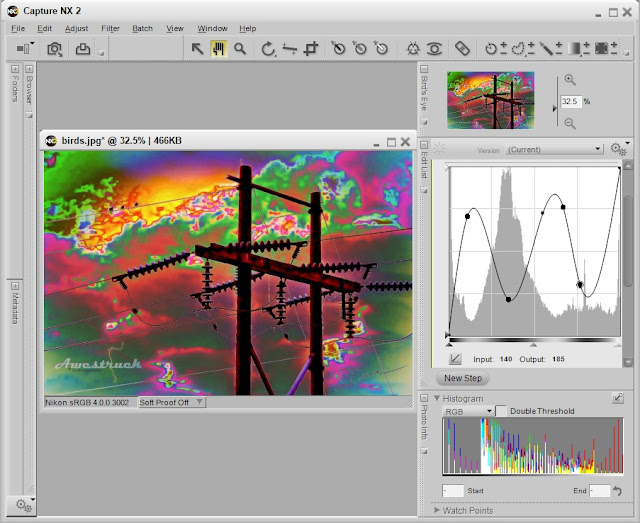
You can even go psychedelic, if you make the curve perform unnatural acts.
Of course there are other examples. See more at Cambridge in Colour.
[Back to the Main Site]
When an image is first opened, the curves tool displays a straight-line relationship, overlaying the histogram of the image. In other words the input tonal values of an image matches the output tonal values. The following screen shot from Capture NX2 shows this relationship.

You can lighten an image by adjusting the far right slider on the bottom toward the middle.

You can darken an image by moving the far left slider on the bottom toward the middle.

For portraits, an S-curve is often used. Just click on the line and adjust it to form an s-shape.

You can create a negative of your image by moving and reversing the end points of the line, until you have a negative slope -- oops, there's some math, again.

You can even go psychedelic, if you make the curve perform unnatural acts.

Of course there are other examples. See more at Cambridge in Colour.
[Back to the Main Site]
Subscribe to:
Posts (Atom)